In this short guide I will show you how to assign a specific IP address to your Raspberry Pi.
The main advantage of a static IP is having a single, consistent way to reach the services running on the Raspberry Pi. Static assignment also lets you build a clear network map when there are many devices involved.
Setting a static IP from the command line (shell)
The IP address can also be assigned via the graphical interface, provided you have chosen to enable it in your Raspberry Pi’s configuration.
If you want to set a static IP, the steps are as follows:
- Open an SSH connection or open the terminal
- Identify the name of the interface to assign the IP to
- Configure the
/etc/dhcpcd.conffile - Restart the network services
- Check the connection settings
Let’s look at them in detail.
Raspberry Pi: opening an SSH connection
First of all, we need to connect to the Raspberry Pi.
The options are:
connect via SSH, or open the terminal from the Raspbian GUI.
To connect to the Raspberry Pi via SSH you need:
- The IP currently assigned to the Raspberry Pi: you can find this in several ways, for example using your router’s network map tool.
- The password for the “pi” user: the password is set when Raspbian is installed. Don’t forget it!
- An SSH terminal: if you use Linux or Mac OS X, just open the terminal; if you use Windows, you can use PuTTY
Using Linux or Mac OS X
Open the terminal and type:

The arguments of the ssh command are therefore:
ssh Raspbian username @ Raspberry Pi IP
Be sure to replace the string xxx.xxx.xxx.xxx with the Raspberry Pi IP you identified.
If typed correctly, the ssh command will then ask you for the password of the pi user.
Once you have entered it, you will be connected to the Raspberry Pi as the pi user.
Using PuTTY on Windows
Although Windows also has PowerShell and Cygwin, PuTTY is the quickest way to access a remote shell via SSH.
Once you have downloaded and installed it, simply configure the SSH connection to access your Raspberry Pi:
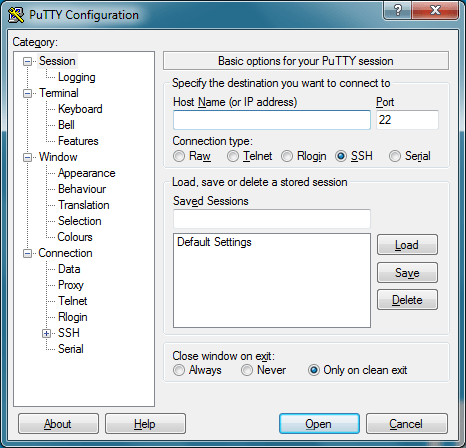
In the Host Name (or IP address) field, enter the string:
pi@xxx.xxx.xxx.xxx
Leave SSH selected as the Connection type.
When you click “Open”, you will be asked to enter the password.
Once you have entered it, you will be logged in to the Raspberry Pi’s shell.
Identifying the name of the interface in use
Once connected to the Raspberry Pi via SSH, before setting the static IP you need to work out which network interface it is for.
Depending on the model, the Raspberry Pi may have more than one network adapter. Setting the IP means first understanding which interface you are connecting through.
Running the ifconfig command gives output similar to this:

In my case, the Raspberry Pi is connected via Wi-Fi: you can see that the IP is assigned to the wlan0 interface. So if I want to set a static IP for my current connection, I need to make a note of the name wlan0.
Configuring the /etc/dhcpcd.conf file
Edit the /etc/dhcpcd.conf file by running the command sudo nano /etc/dhcpcd.conf. Scroll to the last line of the file and add this block of directives:
interface wlan0static ip_address=192.168.1.115/24static routers=192.168.1.1static domain_name_servers=8.8.8.8
The parameters you need to change according to your setup are:
- interface = the name of the interface obtained with ifconfig
- ip_address = the static IP you want to assign to the interface
- routers = your router’s IP address
Restart the network services
Now all you need to do is restart the service that manages network connections:
sudo service dhcpcd restart
If everything works as it should, from now on the Raspberry Pi will have the static IP you chose and will always be reachable at that address. To test it, reopen the SSH connection.
Enjoy!
