EEPROM stands for Electrically Erasable Programmable Read-Only Memory.
EEPROM is very important and useful because it is a form of non-volatile memory. This means that even when the board is switched off, the EEPROM chip retains the value written to it. So when you switch the board off and on again, the data written to the EEPROM can be read. In practice, EEPROM stores data and lets you read it back at any time. This means you can switch a device off, leave it off for days, switch it back on and read the data it contains.
EEPROM is also very efficient, as the individual bytes of a traditional EEPROM can be read, erased and rewritten independently. In most other types of non-volatile memory, this is not possible. Serial EEPROM devices such as Microchip’s 24 series let you add extra memory to any device that can communicate via I²C.
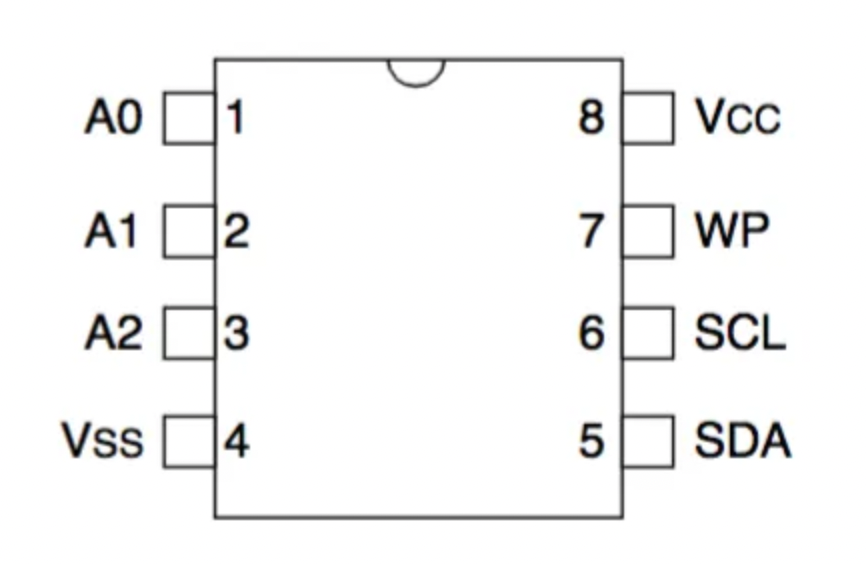
The Microchip 24LC512 chip can be bought in an 8-pin DIP package. The 24LC512’s pins are very easy to identify and consist of power (8), GND (4), write protect (7), SCL/SDA (6, 5) and three address pins (1, 2, 3).
EEPROM quirks
EEPROM as a data storage method has two main drawbacks. In most applications the advantages outweigh the disadvantages, but it is worth knowing about them before incorporating EEPROM into your next project.
First, the technology that makes EEPROM work also limits the number of times it can be rewritten. This is because electrons become trapped in the transistors that make up the ROM and build up until the difference in charge between a “1” and a “0” becomes unrecognisable. But don’t worry: most EEPROMs have a maximum of 1 million rewrites or more. As long as you are not writing to the EEPROM continuously, you are unlikely to reach this limit. Second, EEPROM is not erased when power is removed, but it does not retain data indefinitely. Electrons can escape from the transistors through the insulator, effectively erasing the EEPROM over time. This typically happens over the course of years (although it can be accelerated by heat). Most manufacturers state that data is safe in EEPROM for 10 years or more at room temperature. There is one more thing to bear in mind when choosing an EEPROM device for your project: EEPROM capacity is measured in bits, not bytes, so a 512K EEPROM holds 512Kbit of data — in other words, only 64KB.
Connecting the external EEPROM to Arduino
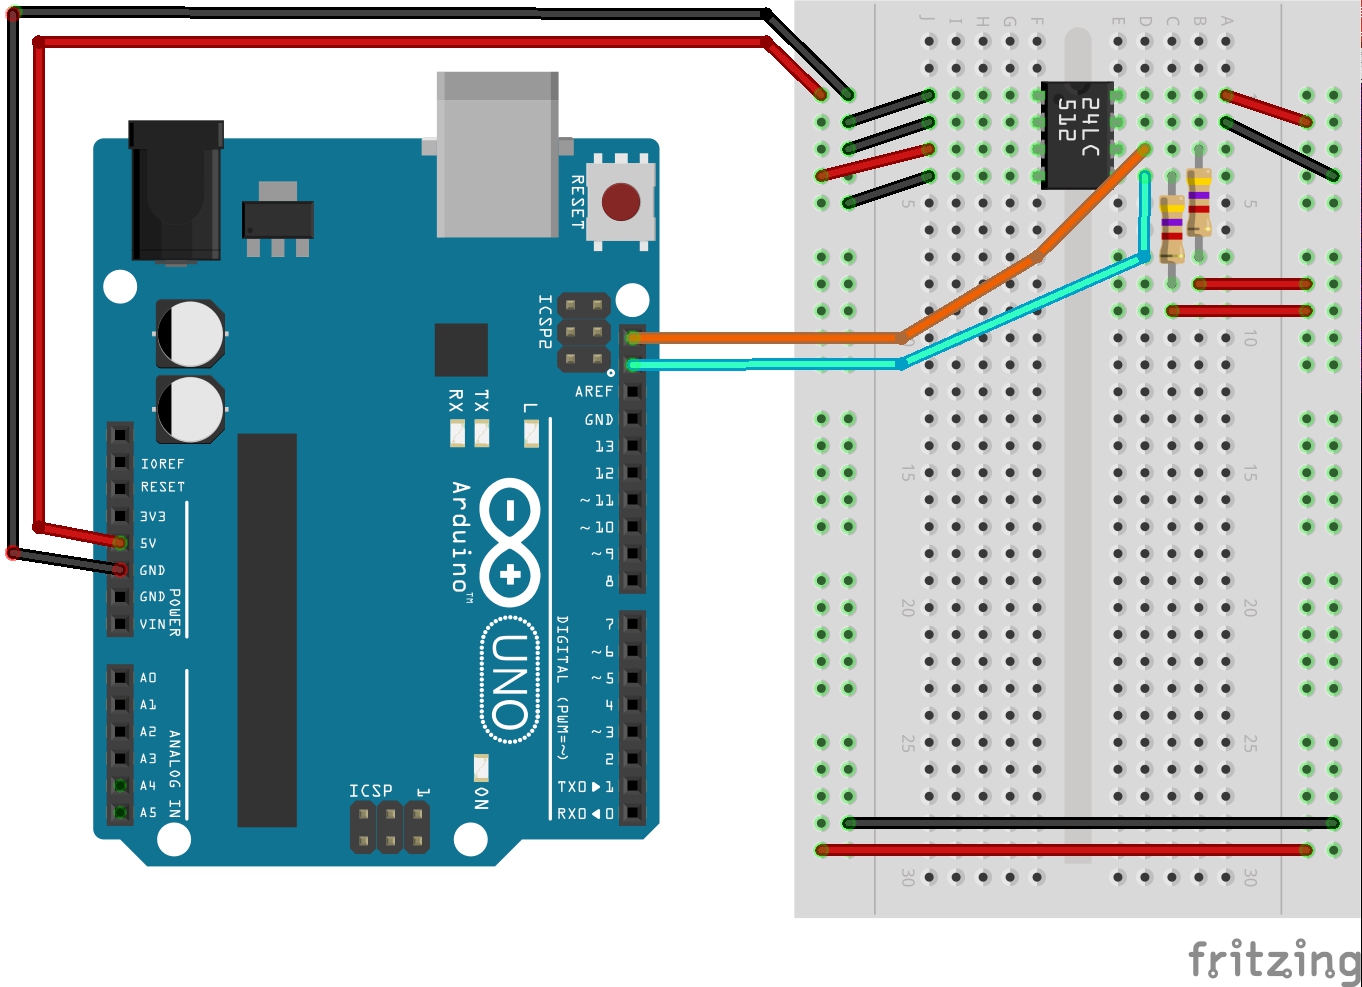
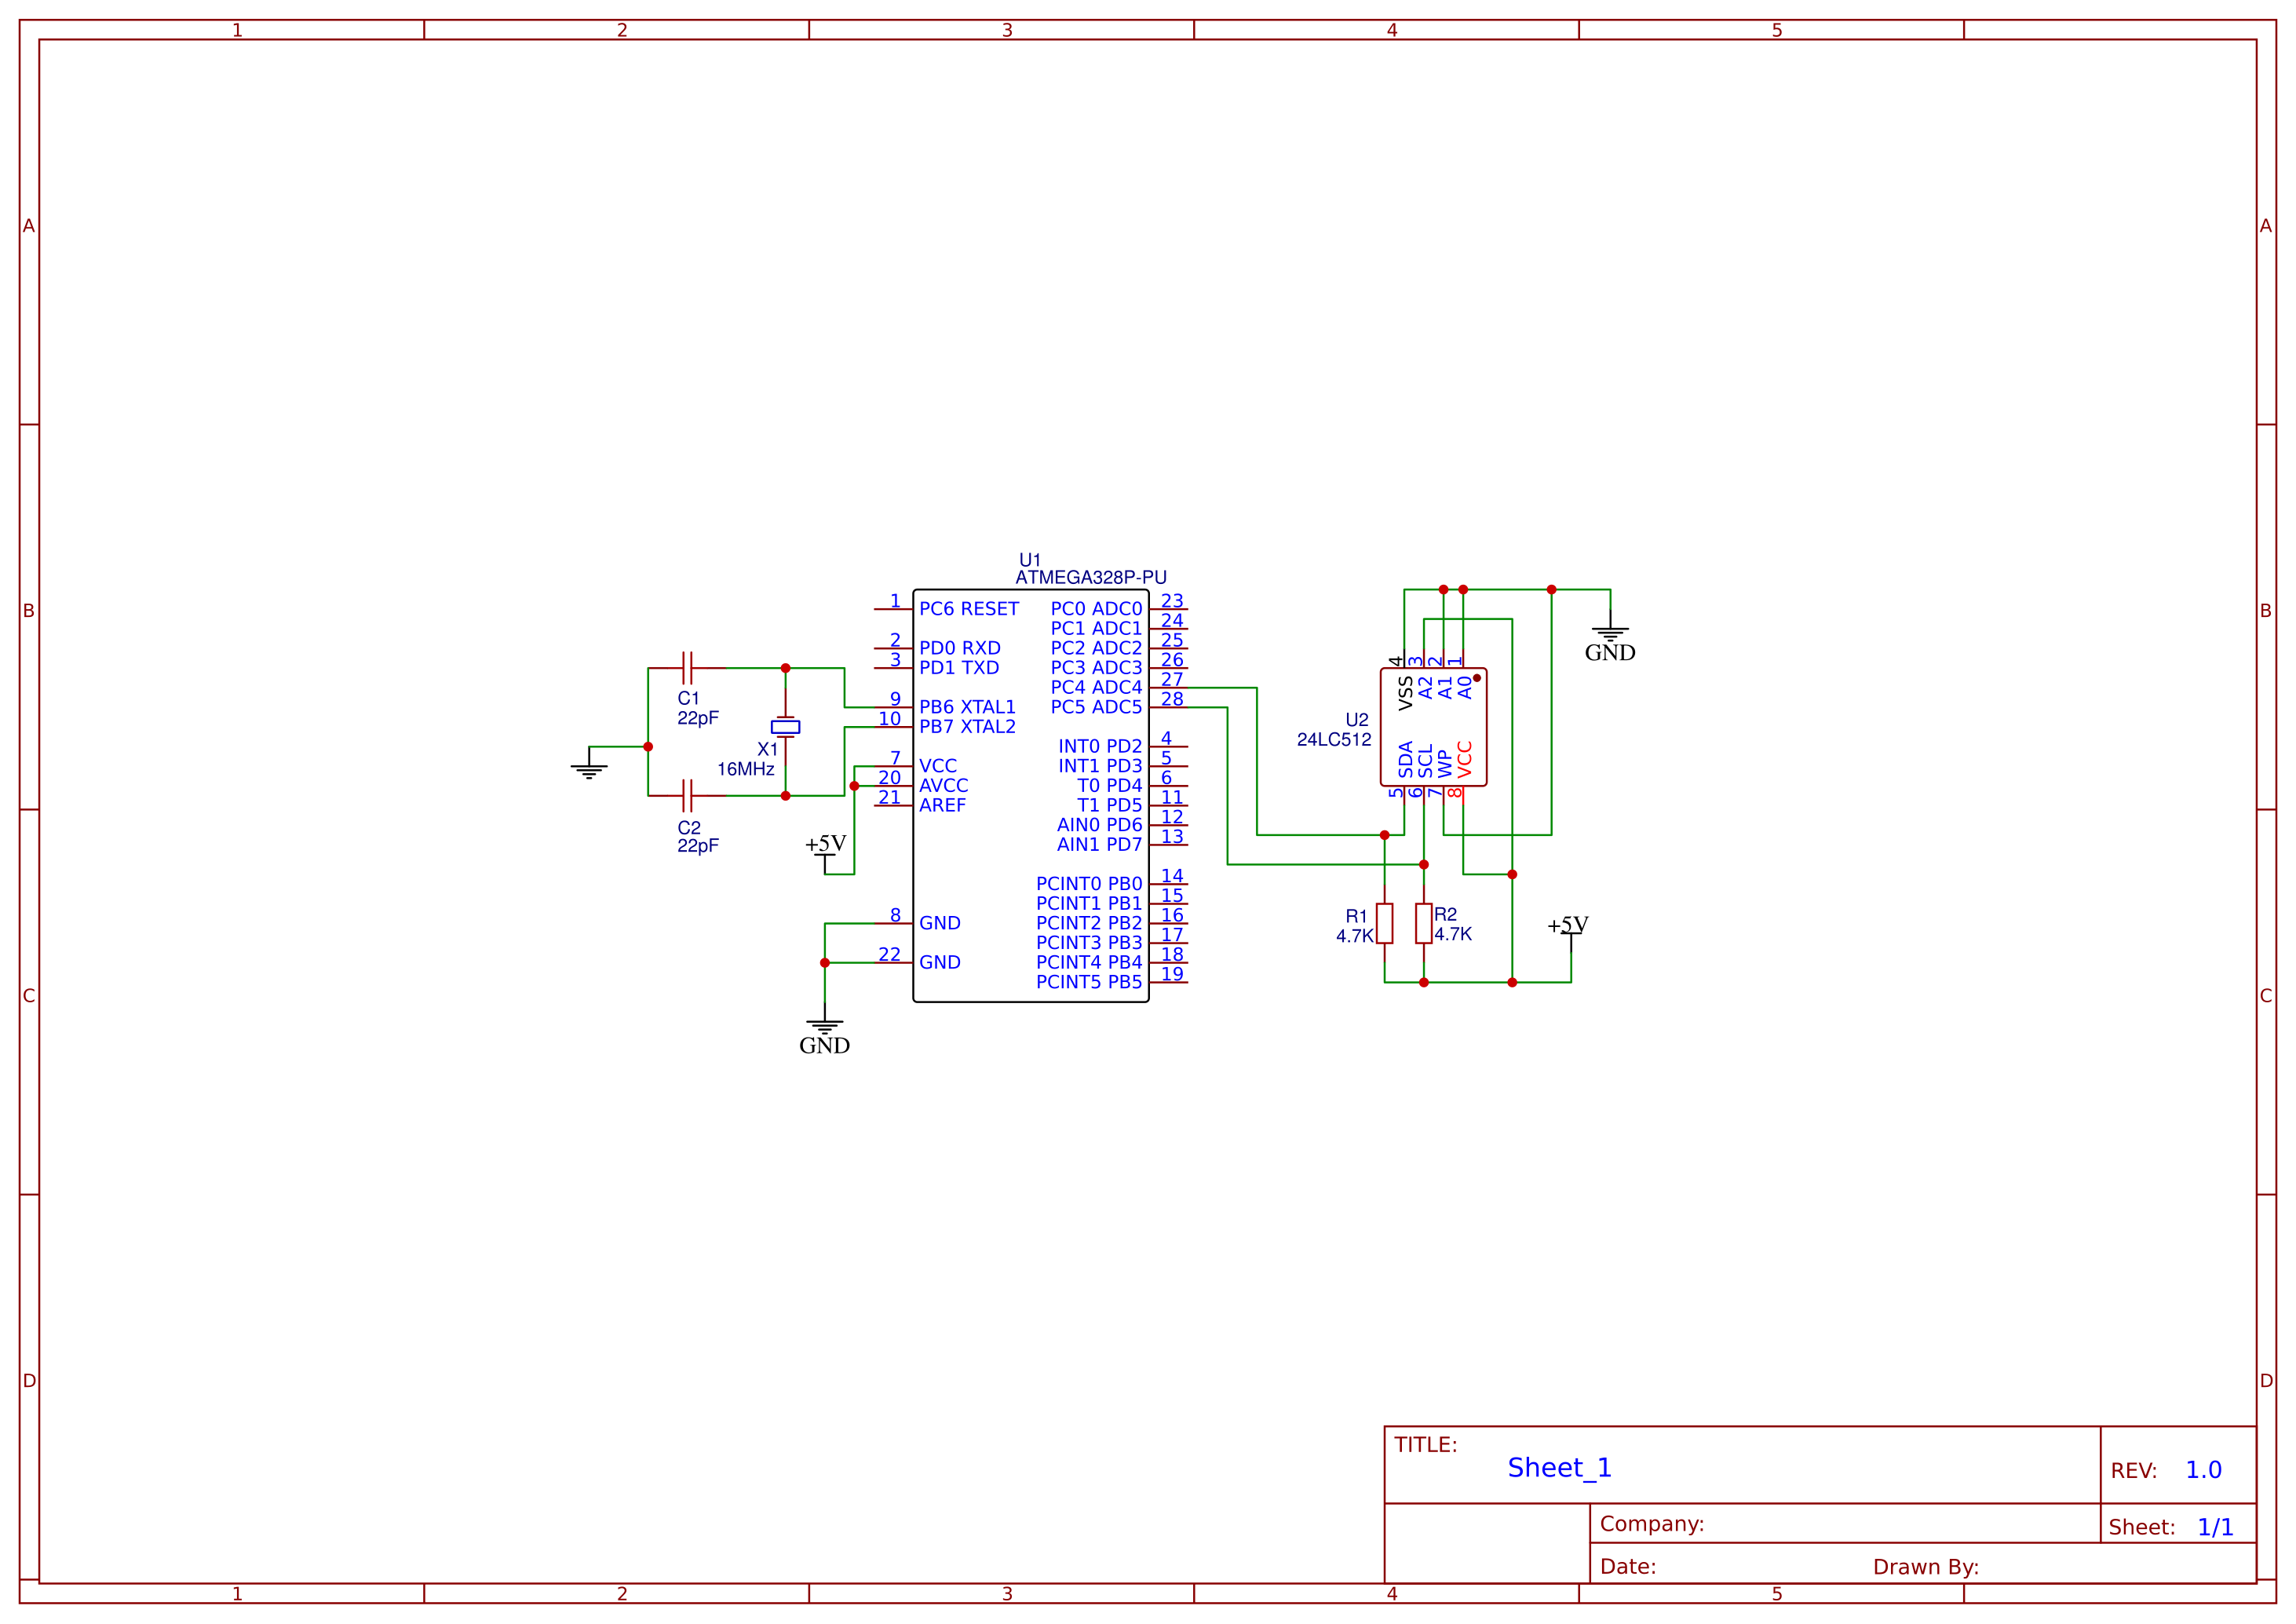
OK, now that we know what an EEPROM is, let’s connect one and see what it can do. To get the device talking, we need to connect power and the I²C serial lines. This device runs at 5VDC, so we will connect it to the 5V output of our Arduino UNO. The I²C lines will also need pull-up resistors for communication to work correctly. The value of these resistors depends on the capacitance of the lines and the communication frequency, but a good rule of thumb for non-critical applications is to keep them in the kΩ range. In this example we will use 4.7kΩ pull-up resistors.
This device has three pins for selecting the I²C address, so you can have several EEPROMs on the I²C bus, each addressed differently. For now we will connect these pins to GND.
We will use a breadboard to connect everything. The attached diagram shows the correct wiring for most I²C EEPROM devices, including Microchip’s 24-series EEPROMs.
Reading and writing
In most cases, when using an EEPROM together with a microcontroller, you don’t need to see the entire contents of the memory at once: you simply read and write bytes here and there as needed. In this example, however, we will write an entire file to the EEPROM and then read it back so that we can view it on our computer. This will get us used to the idea of using EEPROM and give us a sense of how much data can fit in a small device.
Writing something
Our example sketch simply takes any byte that arrives through the serial port and writes it to the EEPROM, keeping track along the way of how many bytes have been written to memory.
Writing a byte of memory to the EEPROM generally takes three steps:
- Send the most significant byte (MSB) of the memory address you want to write to.
- Send the least significant byte (LSB) of the memory address you want to write to.
- Send the data byte you want to store at that location.
There are probably a few key terms that need explaining:
Memory addresses
If you imagine all the bytes of a 512Kbit EEPROM laid out in a row from 0 to 64,000 — because there are 8 bits in a byte, so 64,000 bytes fit in a 512Kbit EEPROM — then a memory address is the position in the row where a given byte is located. We need to send this address to the EEPROM so that it knows where to put the byte we are sending.
Most Significant Byte and Least Significant Byte
Since there are 32,000 possible locations in a 256Kbit EEPROM, and since 255 is the largest number that can be encoded in one byte, we need to send the address in two bytes. First, we send the Most Significant Byte (MSB) — the first 8 bits in this case. Then we send the Least Significant Byte (LSB) — the second 8 bits. Why? Because that’s how the device expects to receive them, that’s all.
Page writing
Writing one byte at a time is fine, but most EEPROM devices have something called a “page write buffer”, which lets you write several bytes at once in the same way you would write a single byte. We will take advantage of this in our example sketch. The EEPROM uses an internal counter that automatically increments the memory location with each subsequent data byte received. Once a memory address has been sent, we can follow it with up to 64 bytes of data. The EEPROM assumes (rightly) that an address of 312 followed by 10 bytes will store byte 0 at address 312, byte 1 at address 313, byte 2 at address 314 and so on.
Reading something
Reading from the EEPROM follows essentially the same three-step process as writing to it:
- Send the most significant byte of the memory address you want to read from.
- Send the least significant byte of the memory address you want to read from.
- Request the data byte at that location.
Diagram and code
#include <Wire.h>
#define eeprom 0x50 //defines the base address of the EEPROM
void setup()  {
  Wire.begin(); //creates a Wire object
  Serial.begin(9600);
  unsigned int address = 0; //first address of the EEPROM
  Serial.println("We write the zip code 22222, a zip code");

  for(address = 0; address< 5; address++) {
    writeEEPROM(eeprom, address, '2'); // Writes 22222 to the EEPROM
  }

  for(address = 0; address< 5; address++) {
    Serial.print(readEEPROM(eeprom, address), HEX);
  }

}

void loop() {
  /*
  there's nothing in the loop() function because we don't want the arduino to
  repeatedly write the same thing to the EEPROM over and over.
  We just want a one-time write, so the loop() function is avoided with EEPROMs.
  */
}

//.........................................defines the writeEEPROM function
void writeEEPROM(int deviceaddress, unsigned int eeaddress, byte data ) {
  Wire.beginTransmission(deviceaddress);
  Wire.write((int)(eeaddress >> 8));      //writes the MSB
  Wire.write((int)(eeaddress & 0xFF));    //writes the LSB
  Wire.write(data);
  Wire.endTransmission();
}

//.........................................defines the readEEPROM function
byte readEEPROM(int deviceaddress, unsigned int eeaddress ) {
  byte rdata = 0xFF;
  Wire.beginTransmission(deviceaddress);
  Wire.write((int)(eeaddress >> 8));      //writes the MSB
  Wire.write((int)(eeaddress & 0xFF));    //writes the LSB
  Wire.endTransmission();
  Wire.requestFrom(deviceaddress,1);
  if (Wire.available())
    rdata = Wire.read();
  return rdata;
}
