All Arduino boards have an EEPROM, a portion of memory that is not erased when the board is switched off.
By reading your Arduino board’s specifications, you can check how much memory is available for storing the data you want to keep.
On the official Arduino website, each board model has a section dedicated to memory, where you will find:
The ATmega328 has 32 KB (with 0.5 KB used for the bootloader).
It also has 2 KB of SRAM and 1 KB of EEPROM (which can be read and written
with the EEPROM library).
This sentence refers to the Arduino Uno Rev.3 and means that the ATmega328 used on the Arduino Uno has:
- 32KB (of which 0.5KB is used for the bootloader, the base system that makes the Arduino usable and allows it to receive and run your sketches);
- 2 KB of SRAM;
- 1KB of EEPROM, i.e. 1,024 cells in which you can store and retrieve your data, even after a power outage.
Some Arduino boards have only 512 bytes (for example those equipped with the ATmega168), while others, such as the Mega (with an ATmega1280 or 2560 microcontroller), have 4KB.
If this is not enough, you can opt for an external EEPROM managed by your Arduino board, or use an SD shield with 2GB of storage and write your values to simple files to be read back at every boot.
Each cell can store a value from 0 to 255, i.e. an integer value.
To use this memory, a library is available: EEPROM.h, already included in the Arduino IDE, which you can easily include with the line: #include <EEPROM.h>.
The EEPROM.h library provides three methods (functions), so it is very simple to use:
read(address): this function reads a value stored in the cell specified as address;
write(address,value): this function writes the value (value) to be stored in one of the 512, 1,024 or 4,096 cells (address).
update(address,value): this last function also writes the value (value) to be stored in one of the 512, 1,024 or 4,096 cells (address), but only if the new value differs from the value currently stored in that memory cell.
Below is an example sketch that simply prints to the serial monitor the contents of each cell of the EEPROM
#include <EEPROM.h>
int value;

void setup()
{
  Serial.begin(115200);
}

void loop()
{
  for (int indice_cella=0; indice_cella < 512; indice_cella++) {
    value = EEPROM.read(indice_cella);
    Serial.print(indice_cella);
    Serial.print("\t");
    Serial.print(value);
    Serial.println();
    delay(500);
  }
}
Looking at the sketch:
line 1 includes the EEPROM.h library with the #include directive;
line 2 declares a variable, value, which will hold the values read from the EEPROM;
In the setup() function, serial communication is initialised at 115200 baud; we use serial communication to print the values read to the serial monitor, which is especially useful the first time, to check the values stored in a given cell;
In the loop() function, I used a for loop to go through the EEPROM cells, from cell 0 up to and including cell 511. Inside this for loop, the Arduino board reads each cell in turn and prints its value to the serial monitor.
On the last line of the for loop, I set a 500-millisecond delay between one read and the next.
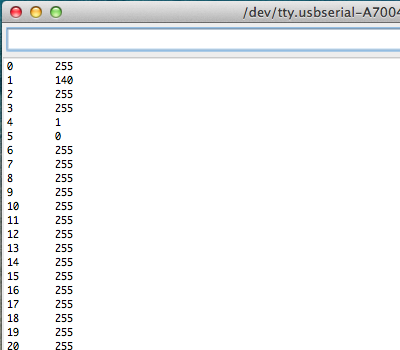
Running the sketch on my Arduino Uno, the EEPROM shows:
Reading from the EEPROM is just the beginning: if you want to use it in a project, you first need to write the values you want to retrieve. Here is the official sketch recommended on the Arduino website:
#include <EEPROM.h>

void setup()
{
  for (int i = 0; i < 512; i++)
    EEPROM.write(i, i);
}

void loop(){}
In this case, the authors chose not to use the loop function to write to the EEPROM, but instead used a for loop from 0 to 512 in which each cell is written with its own cell number.
With a small change to this sketch, we can both write and read the EEPROM values in the same sketch
#include <EEPROM.h>
int value;

void setup()
{
  Serial.begin(9600);
  for (int i = 0; i < 512; i++)
    EEPROM.write(i, i);
}

void loop()
{
  for (int indice_cella=0; indice_cella < 512; indice_cella++) {
    value = EEPROM.read(indice_cella);
    Serial.print(indice_cella);
    Serial.print("\t");
    Serial.print(value);
    Serial.println();
    delay(500);
  }
}
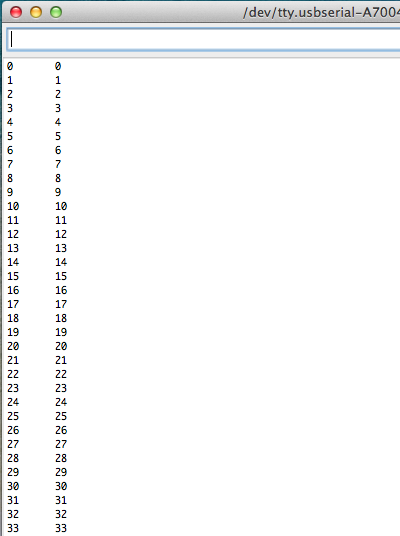
You may have noticed a small error, present in the original sketch too: the values that can be stored in each cell range from 0 to 255, while the for loop tries to write higher values to cells 256 to 511. The result, of course, is that these cells will contain 255, the maximum possible value.
Here is the result of the sketch running on my Arduino:
Notes:
1. Writing each cell takes 3.3 milliseconds, so bear this in mind when storing data in the EEPROM;
2. EEPROMs can be written a maximum of 100,000 times, where a write means each time you change the value in a cell. Given that the EEPROM is usually only used to store configuration data, this is a very high number;
Enjoy!
