In the previous article on installing HAP-NodeJS, we saw that when the node service starts, a series of accessories appear in the Home app on our Apple devices. On the Raspberry Pi, these accessories are located in the /home/pi/HAP-NodeJS/src/accessories folder.
Each accessory has a file ending in _accessory.ts (e.g. Thermostat_accessory.ts…). We can modify these files, or create new ones based on them.
Personally, I needed to connect the various HomeKit accessories to Arduino-type devices using the MQTT protocol (Mosquitto). There are other ways to make the Raspberry Pi communicate with these boards, but this protocol made everything much simpler for me.
The first step is to install an MQTT broker on the Raspberry Pi. A few days ago I wrote an article (available at this link) explaining how to install it on a Raspberry Pi.
The next step is to install a node package to add MQTT support; below is the command to run from the terminal
cd /home/pi/HAP-NodeJSsudo npm install mqtt --save
sudo npm install mqtt -g
Now, to make things simpler, I have created this series of commands, which move all the “demo” accessories into a folder called defaultAccessories (so that they are ignored when the HAP-NodeJS service runs) and then download my sample MQTT accessory and place it in the /home/pi/HAP-NodeJS/src/accessories folder.
cd /home/pi/HAP-NodeJS/src/accessoriessudo mkdir defaultAccessories
sudo mv *_accessory.ts defaultAccessorieswget https://fargionconsulting.com/wp-content/uploads/2020/02/desklight_accessory.ts
Essentially, in this accessory I added a few sections to the default code and, with a few functions, integrated the management of a light bulb’s state (ON or OFF) via the MQTT protocol.
Now let’s move on to the Arduino code for the Wemos D1 mini,
which you can download from this link.
Here too, note that some libraries need to be installed in the Arduino IDE; they are listed below:
- ArduinoOTA (available from the Library Manager in the Arduino IDE)
- PubSubClient by Nick O’Leary (available from the Library Manager in the Arduino IDE)
- RemoteDebug by Joao Lopes (available from the Library Manager in the Arduino IDE)
Now, before uploading the Arduino code to the Wemos D1 mini board (as well as selecting the right serial port, the correct board and the correct baud rate), we need to update the Arduino code with the name and password of our Wi-Fi network and the IP address of our Raspberry Pi — and that’s it!

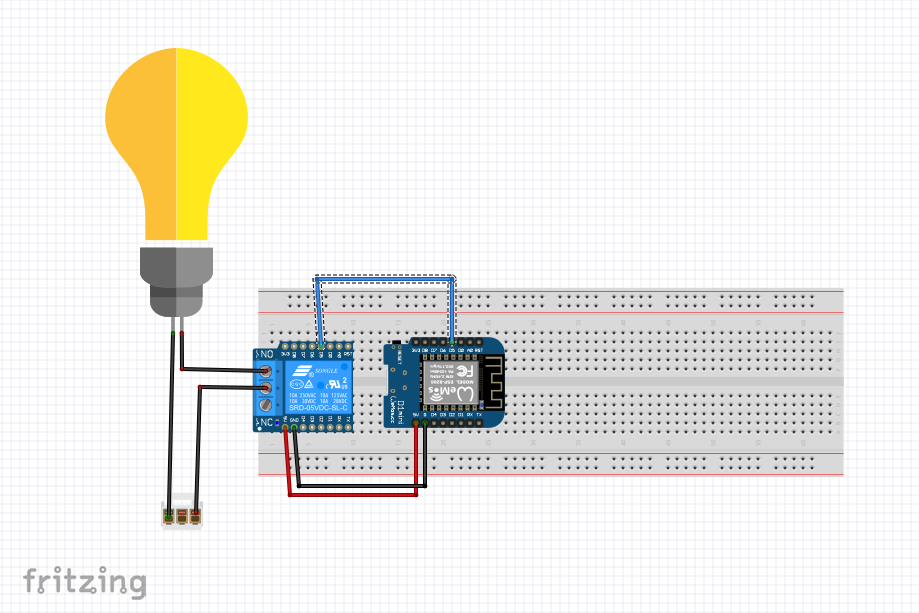
To connect the light bulb, you need to attach a relay shield to the Wemos D1 mini board, which requires no soldering, or alternatively a 5V relay (for control). Either way, a wiring diagram is shown below.
Enjoy!
