What is EEPROM?
EEPROM (Electrically Erasable Programmable Read-Only Memory) chips are special microchips used to store data even after the device they are mounted on has been switched off. The next time it is switched on, the device will have that data available to load. In other words, they are memory devices which, unlike RAM, can retain information even after the power supply has been switched off.
Many microcontrollers, including those used in Arduino boards such as the ATmega328, have built-in EEPROM that allows a set of useful data to be retained even after the device is switched off. So we often talk about EEPROM memory, much as we refer to RAM.
Every Arduino board therefore has this type of memory, although its size varies depending on the model. In particular, the size depends on the type of processor used by the board.
- 512 bytes on the ATmega168 and ATmega8
- 1024 bytes on the ATmega328P
- 4096 bytes on the ATmega1280 and ATmega2560.
You can also expand the amount of EEPROM available by using dedicated chips connected to the board that communicate using the I²C protocol (such as the Microchip 24LC1025).
A few fun facts about EEPROM: there is actually a limit to the number of times its memory cells can be rewritten. But there’s nothing to worry about, as it is around a million rewrites. Still, it is important to bear this in mind in certain applications. The same goes for how long a cell can retain data without power: manufacturers state a limit of 10 years, but this period can vary depending on the chip’s storage conditions and temperature.
What is EEPROM used for on Arduino?
Arduino boards, like all processors right up to computers themselves, need memory to store information. To do so, Arduino has three different types of memory:
- FLASH memory
- RAM
- EEPROM
FLASH memory is used by Arduino to store the sketch code once it has been compiled. Once uploaded, the code remains unchanged until the next upload (new compiled code). When the Arduino board is switched on, it reads the code to run from here. Like EEPROM, FLASH memory retains information after the board is switched off.
RAM is used to hold the values of the variables defined in the sketch code that are needed for the program to run correctly. Their contents change throughout execution, variables can be created and destroyed, and once the device is switched off the entire memory, including its data, is erased.
EEPROM is used to store data and parameters that need to be used even after the device has been switched off. Its role is therefore very similar to that of a hard disk in a computer, where data files are stored so that they can be kept over time.
So EEPROM has a fairly specific function. One example of how it might be used on Arduino is to save a particular configuration or a set of recovery data, so that the next time the board is switched on it can resume from a particular point (restoring the previous session).
An important point to bear in mind about EEPROM is not to use it for reading and writing ordinary variables, which should be done in RAM. There are several reasons for this… not only the fact that cells cannot be rewritten an unlimited number of times, but above all performance. EEPROM was designed for different purposes from RAM, so its access and write times are much slower.
The EEPROM library
To work efficiently with EEPROM in sketches, the Arduino editor, Arduino IDE, provides a library with many functions that make reading from and writing to it easier: the EEPROM library.
So first of all, if we intend to use this library, we need to include it at the beginning of the sketch.
#include <EEPROM.h>
One thing to bear in mind before starting to write the sketch is that when dealing with EEPROM you need to work with memory addresses.
Every time you write a value to the EEPROM, or need to access one, you must specify the memory address. Given that a standard Arduino UNO has 512 bytes of EEPROM, we have a set of addresses ranging from 0 to 511.
So to write and read data to and from the EEPROM, we use the read and write functions provided by the library, specifying these values in the parameters.
EEPROM.write(address, value)
EEPROM.read(address)
As for the values that can be written, they must fit in a single byte of memory. We will look at this in detail in the following examples.
Writing and reading values on the EEPROM
To see how writing to and reading from the Arduino’s EEPROM works, let’s implement a useful example.
We will write a sketch in which we enter integers from 1 to 9 on the keyboard via the Serial Monitor, and these are progressively added together.
This is a great way to simulate acquiring data over serial while a program is running. The sum of the values entered will be held in the variable value.
At some point this value will be stored on the EEPROM for future use, for example by entering the command ‘w’ (for write) over serial.
In these cases it is important to understand the range of values this variable can take. If it is an integer from 0 to 255, we can use a single byte, while if it is between 0 and 65,535 we will need two bytes.
In the first case (a single byte), it is simple: you specify value directly in the EEPROM.write( address, value) command. The same applies to the memory address, which corresponds to a single 1-byte cell. But what about 2 or more bytes?
In these cases you need to manage several memory cells at once. A good strategy is to use adjacent memory addresses. In our simple example, using integer values that take up 2 bytes, we will use the first two cells, with addresses 0 and 1.
So we define two integer constants, COUNT_ADDR1 and COUNT_ADDR2, to define the two EEPROM memory addresses dedicated to holding value. We also define the variable value, initialising it to 0.
#include <EEPROM.h>
const int COUNT_ADDR1 = 0;
const int COUNT_ADDR2 = 1;
int value = 0;
Next, in the sketch’s setup() function, we first set up serial communication at 9600 baud.
We read the two values contained in the first two cells and put them into the variables hiByte and lwByte. To recombine the two parts into the original integer value, we use the word() function.
Then, with a text string, we print the value read, prevCount, over serial.
void setup() {
   Serial.begin(9600);
   byte hiByte = EEPROM.read(COUNT_ADDR1);
   byte lwByte = EEPROM.read(COUNT_ADDR2);
   int prevCount = word(hiByte, lwByte);
   Serial.print("In the previous session, your Arduino counted ");
   Serial.print(prevCount);
   Serial.println(" events");
}
The value displayed is exactly the one stored the last time we used the Arduino, i.e. the last one we saved before disconnecting power from the board.
Now, in the loop() function, we implement the interactive program that reads the integers entered by the user over serial and waits for the ‘r’ and ‘w’ commands to read and write the data stored on the EEPROM.
First, in a nested if, we handle the numeric characters between 0 and 9, which are interpreted as numbers and added to the existing value of value, which is printed at each update.
void loop() {
   if( Serial.available()){
      char ch = Serial.read();
      if ( ch >= '0' && ch <= '9'){
         value = value + (ch - '0');
         Serial.print("value =");
         Serial.println(value);
      }
If the character entered over serial is ‘w’, the sketch writes the value to the EEPROM.
So we split the integer into the two bytes highByte and lowByte, and then the two values are written using EEPROM.write().
We then reset value so that it starts again from 0.
 if ( ch == 'w' ){
       byte hi = highByte(value);
       byte lw = lowByte(value);
       EEPROM.write(COUNT_ADDR1, hi);
       EEPROM.write(COUNT_ADDR2,lw);
       Serial.println("value written on EEPROM");
       value = 0;
   }
If, on the other hand, the character entered is ‘r’ (read), the value contained in the first two EEPROM cells is read.
The two byte values of the individual cells are read and then recombined into the integer value with the word() function.
   if ( ch == 'r'){
       byte hi = EEPROM.read(COUNT_ADDR1);
       byte lw = EEPROM.read(COUNT_ADDR2);
       int v = word(hi, lw);
       Serial.print("value read on EEPROM: ");
       Serial.println(v);
   }
 }
}
The sketch code is now complete. Verify and compile the code, then upload it to the Arduino.
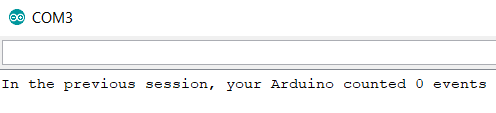
Open the serial monitor and wait 1 or 2 seconds. In my case, the value read from the EEPROM is 0.
Start entering a series of numeric values on the keyboard

Once a certain value has been reached, we decide to write it to the EEPROM: type ‘w’ on the keyboard and press ENTER.
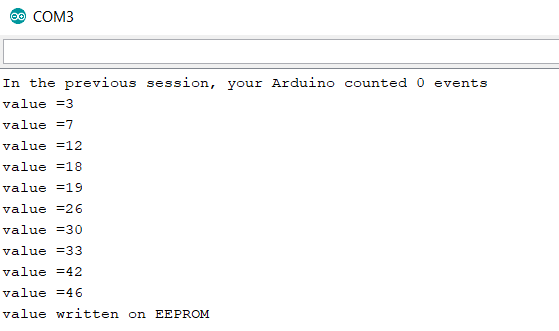
Now switch the Arduino board off and on again and then reopen the serial monitor.

The EEPROM.update method
In the previous sketch we used EEPROM.write to write values to the EEPROM’s memory cells.
A more efficient way to do this is to use the EEPROM.update method.
This differs from the previous one in that the memory cell is only written if its contents differ from the value to be written.
This avoids rewriting the same value to a cell, which would shorten its lifespan, by skipping an unnecessary operation.
if ( ch == 'w' ){
    byte hi = highByte(value);
    byte lw = lowByte(value);
    EEPROM.update(COUNT_ADDR1, hi);
    EEPROM.update(COUNT_ADDR2,lw);
    Serial.println("value written on EEPROM");
    value = 0;
}
EEPROM.get and EEPROM.put
In the previous example we saw the write and read methods, which work at the level of individual memory cells.
At a higher level there are the EEPROM.get and EEPROM.put methods, which let you work directly at the variable level, regardless of how many bytes it takes up.
Let’s rewrite the sketch from the previous example
#include <EEPROM.h>
const int COUNT_ADDR = 0;
int value = 0;
void setup() {
    Serial.begin(9600);
    int prevCount;
    EEPROM.get(COUNT_ADDR, prevCount);
    Serial.print("In the previous session, your Arduino counted ");
    Serial.print(prevCount);
    Serial.println(" events");
}
void loop() {
    if( Serial.available()){
       char ch = Serial.read();
       if ( ch >= '0' && ch <= '9'){
          value = value + (ch - '0');
          Serial.print("value =");
          Serial.println(value);
       }
       if ( ch == 'w' ){
          EEPROM.put(COUNT_ADDR, value);
          Serial.println("value written on EEPROM");
          value = 0;
       }
       if ( ch == 'r'){
          int v;
          EEPROM.get(COUNT_ADDR, v);
          Serial.print("value read on EEPROM: ");
          Serial.println(v);
       }
    }
}
As you can see from the code, it is no longer necessary to split the data into bytes and handle writing each one individually.
The EEPROM.get() and EEPROM.put() methods can work out how many bytes need to be handled based on the type of data passed as a parameter, so only one address is needed.
- EEPROM.get(address, value)
- EEPROM.put(address, value)
This is why both methods require two parameters. In addition, value is passed by reference and is therefore updated directly, so the EEPROM.get() method does not return a value.
Iterating over the EEPROM
So far we have seen examples in which individual cell addresses are specified to hold specific variables.
The most common operation on the EEPROM is moving through its memory space. There are several approaches.
You can use a for loop;
   for (int index = 0 ; index < EEPROM.length() ; index++) {
        //Add one to each cell in the EEPROM
        EEPROM[ index ] += 1;
  }
a while loop;
  int index = 0;
  while (index < EEPROM.length()) {
    //Add one to each cell in the EEPROM
    EEPROM[ index ] += 1;
    index++;
  }
or a do while loop
int index = 0;
  do {
    //Add one to each cell in the EEPROM
    EEPROM[ index ] += 1;
    index++;
  } while (index < EEPROM.length());
For iterative loops, the EEPROM.length() function is very useful.
This function returns an unsigned int value containing the size of the EEPROM, i.e. the number of memory cells.
This can in fact vary from one Arduino model to another.
A Cyclic Redundancy Check (CRC) on the EEPROM
A CRC is a simple way to check whether data that has been modified has become corrupted. This example calculates a CRC value directly on the EEPROM’s contents.
This CRC acts like a signature, and any change in the calculated CRC value means a change in the stored data. Below we will see how the EEPROM object can be used as an array.
#include <Arduino.h>
#include <EEPROM.h>
void setup() {
  //Start serial
  Serial.begin(9600);
  while (!Serial) {
    ; // wait for serial port to connect. Needed for native USB port only
  }
  //Print length of data to run CRC on.
  Serial.print("EEPROM length: ");
  Serial.println(EEPROM.length());
  //Print the result of calling eeprom_crc()
  Serial.print("CRC32 of EEPROM data: 0x");
  Serial.println(eeprom_crc(), HEX);
  Serial.print("\n\nDone!");
}
void loop() {
  /* Empty loop */
}
unsigned long eeprom_crc(void) {
  const unsigned long crc_table[16] = {
    0x00000000, 0x1db71064, 0x3b6e20c8, 0x26d930ac,
    0x76dc4190, 0x6b6b51f4, 0x4db26158, 0x5005713c,
    0xedb88320, 0xf00f9344, 0xd6d6a3e8, 0xcb61b38c,
    0x9b64c2b0, 0x86d3d2d4, 0xa00ae278, 0xbdbdf21c
  };
  unsigned long crc = ~0L;
  for (int index = 0 ; index < EEPROM.length()  ; ++index) {
    crc = crc_table[(crc ^ EEPROM[index]) & 0x0f] ^ (crc >> 4);
    crc = crc_table[(crc ^ (EEPROM[index] >> 4)) & 0x0f] ^ (crc >> 4);
    crc = ~crc;
  }
  return crc;
}
Enjoy!
