In this article I will describe how to self-host Bitwarden on our Raspberry Pi using Docker.
Bitwarden is a free, open-source password manager that lets us keep full control over where and how our passwords are stored. It is widely considered the best free solution for anyone who wants a secure password manager.
The Raspberry Pi is a perfect platform for hosting Bitwarden: it uses very little power, so keeping it on 24 hours a day costs next to nothing, and all the Bitwarden clients (desktop, smartphone and browser extensions) will connect to this server to sync your passwords.
Since the Raspberry Pi does not have a lot of processing power, we will use Vaultwarden (formerly Bitwarden_RS), an unofficial re-implementation of the Bitwarden server API written in Rust. It is much lighter than the original and perfect for running on a Raspberry Pi. Vaultwarden is compatible with all the official Bitwarden clients.
Prerequisites
- a Raspberry Pi (I recommend a Raspberry Pi 3 or later) running Raspberry Pi OS;
- Docker and Docker Compose installed (here is the guide on how to install them);
- optional: Portainer, to manage containers through a web interface;
- optional, but recommended if you want to use Bitwarden away from home: a domain name (or a DDNS, here is a guide on how to set up DuckDNS).
Important: the Bitwarden web interface and clients only work over an HTTPS connection. For this reason, besides the container, in this guide we will also set up a reverse proxy with an SSL certificate.
Before we start, let’s update the operating system with the following two commands:
$ sudo apt update
$ sudo apt upgrade -y
Installing Bitwarden on Raspberry Pi
Since it is available as a Docker image, installing Bitwarden is very simple: below we will see how to do it both with Portainer and from the command line with Docker Compose. Choose the method you prefer.
Method 1: installation with Portainer
Let’s open the Portainer web interface, reachable at the IP address of the Raspberry Pi on port 9000:
http://RASPBERRY_IP:9000
replacing RASPBERRY_IP with the IP address of our Raspberry Pi, and select the local Docker environment.
Before creating the container we create a dedicated volume, where all the Bitwarden data will be stored: in the sidebar click on “Volumes” and then on the “Add volume” button. Give the volume a name, for example “bitwarden“, and click on “Create the volume“.
Once the volume is created, go to the “Containers” menu in the sidebar and click on the “Add container” button at the top.
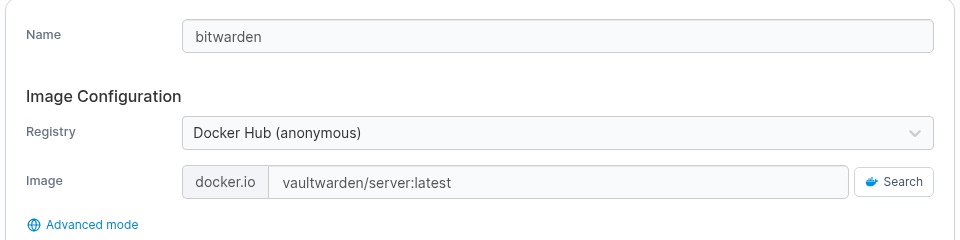
Give the container a name, for example “bitwarden“, and as the image to download from Docker Hub enter:
vaultwarden/server:latest
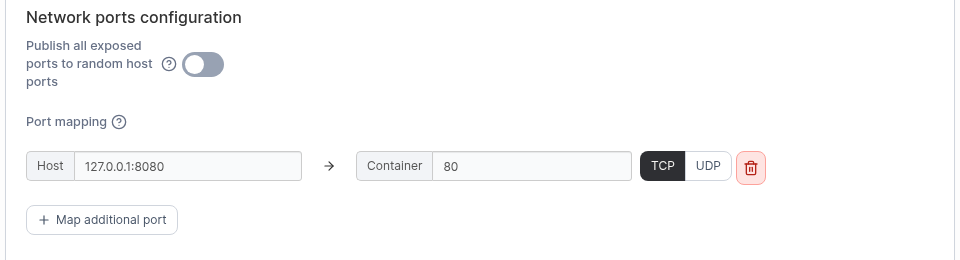
Scroll down to “Network ports configuration” and click on “Map additional port” to add the port to expose:
- in the “Host” field enter
127.0.0.1:8080and in the “Container” field80: this is the port on which the Bitwarden web interface will be reachable (in recent versions of Vaultwarden it is also used for real-time notifications via websocket, so there is no longer any need to expose the old port 3012).
The port stays bound to localhost (127.0.0.1) only: we do not need to expose it directly, because the reverse proxy we will configure later will make it accessible over HTTPS.
Scroll down to “Advanced container settings“, open the “Volumes” tab and click on “map additional volume“. Set /data as the path in the container and select the volume created earlier (“bitwarden“) as the volume.
In the “Env” tab click on “add environment variable” and add the DOMAIN variable with the full address we will use to reach Bitwarden, for example https://bitwarden.yourdomain.com (or https://RASPBERRY_IP if you will only use it on your local network). Bitwarden uses this value to generate links correctly, for example in invitation emails.
Finally, to keep Bitwarden always online, open the “Restart policy” tab and select “Unless stopped“: this way Docker will restart the container in case of problems and every time the Raspberry Pi reboots.
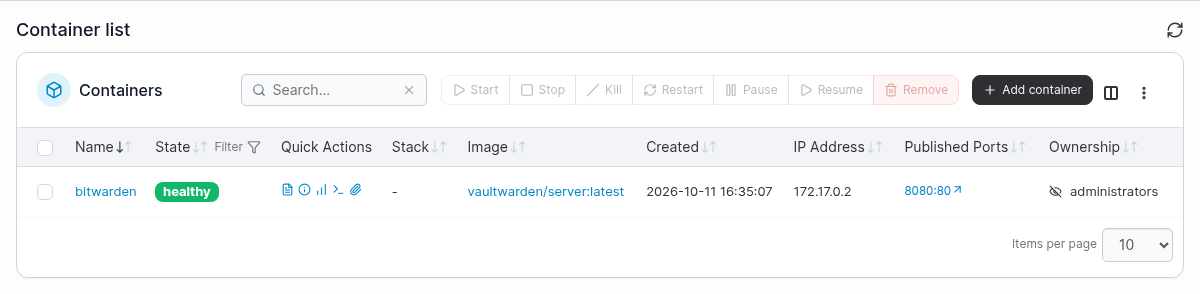
We can now deploy the container by clicking on the “Deploy the container” button at the bottom of the page. Once the image has been downloaded, the Bitwarden container will appear in the list of containers.
Method 2: installation with Docker Compose
If we prefer not to use Portainer, we can install Bitwarden from the command line with Docker Compose. Let’s connect to the Raspberry Pi via SSH and create a folder that will hold the configuration file and the container data:
$ mkdir ~/vaultwarden
$ cd ~/vaultwarden
$ nano docker-compose.yml
and paste the following:
services:
  vaultwarden:
    image: vaultwarden/server:latest
    container_name: bitwarden
    restart: unless-stopped
    environment:
      - DOMAIN=https://bitwarden.yourdomain.com
    volumes:
      - ./vw-data:/data
    ports:
      - 127.0.0.1:8080:80
replacing bitwarden.yourdomain.com with your domain name (or with the IP address of the Raspberry Pi). Save the file by pressing CTRL+X, then Y and finally ENTER.
Now all that is left is to start the container with the command:
$ docker compose up -d
As in the Portainer version, port 8080 stays bound to 127.0.0.1: the reverse proxy, configured in the next section, will make Bitwarden reachable over HTTPS. All the Bitwarden data will be saved in the ~/vaultwarden/vw-data folder.
Setting up a reverse proxy for Bitwarden
As mentioned, Bitwarden requires an HTTPS connection. If you already use NGINX Proxy Manager, all you need to do is create a new Proxy Host pointing to the Raspberry Pi on port 8080, enabling the “Websockets Support” option and requesting a Let’s Encrypt certificate from the SSL tab (in this case, publish the container port as 8080:80 instead of 127.0.0.1:8080:80, so that NGINX Proxy Manager can reach it). You can then skip straight to the “Accessing the Bitwarden web interface” section.
Alternatively, below we will see how to manually configure NGINX as a reverse proxy directly on the Raspberry Pi. If it is not already installed, let’s install it with:
$ sudo apt install nginx -y
There is no need to install PHP as well, since we will only use NGINX as a reverse proxy to the Bitwarden container.
The SSL certificate
For the HTTPS connection we need an SSL certificate. There are two options:
- if you have a domain name, you can use Let’s Encrypt to generate a free signed certificate (it is not possible to generate a signed one using only an IP address): in this case take note of the folder where the certificate is saved and go straight to the NGINX configuration;
- alternatively we can generate a self-signed certificate: the connection will still be encrypted, but the browser will show a warning because the certificate is not signed by a recognised certificate authority.
Note: the Bitwarden smartphone apps usually do not accept self-signed certificates. If you also want to use Bitwarden from your smartphone, I strongly recommend using a domain name with a Let’s Encrypt certificate.
To generate a self-signed certificate, run:
$ sudo openssl req -x509 -nodes -days 365 -newkey rsa:4096 -keyout /etc/ssl/private/nginx-bitwarden.key -out /etc/ssl/certs/nginx-bitwarden.crt
The certificate will be valid for 365 days and will be saved in the /etc/ssl/private/ and /etc/ssl/certs/ folders. During generation, OpenSSL will ask for some details to include in the certificate:
Country Name (2 letter code) [AU]: IT
State or Province Name (full name) [Some-State]: Italy
Locality Name (eg, city) []: Rome
Organization Name (eg, company) [Internet Widgits Pty Ltd]: YourCompany
Organizational Unit Name (eg, section) []:
Common Name (e.g. server FQDN or YOUR name) []: RASPBERRY_IP
Email Address []: youremail@yourdomain.com
As a last step, let’s create a strong Diffie-Hellman group to make SSL connections more secure (this can take a few minutes):
$ sudo openssl dhparam -out /etc/ssl/certs/dhparam.pem 2048
Configuring NGINX as a proxy
First, let’s remove the default NGINX site (this step is not needed if you are already using NGINX for other sites on the Raspberry Pi):
$ sudo rm /etc/nginx/sites-enabled/default
Create a new configuration file with the nano editor:
$ sudo nano /etc/nginx/sites-available/bitwarden.conf
and paste the following:
map $http_upgrade $connection_upgrade {
    default upgrade;
    ''      "";
}

server {
    listen 80;
    listen [::]:80;
    server_name _; #Replace with your own domain name
    return 301 https://$host$request_uri;
}

server {
    listen 443 ssl http2;
    listen [::]:443 ssl http2;
    server_name _; #Replace with your own domain name

    ssl_certificate      /etc/ssl/certs/nginx-bitwarden.crt;   #Replace with the Let's Encrypt path if you use a signed certificate
    ssl_certificate_key  /etc/ssl/private/nginx-bitwarden.key; #Replace with the Let's Encrypt path if you use a signed certificate
    ssl_dhparam /etc/ssl/certs/dhparam.pem;

    # Allow large attachments
    client_max_body_size 128M;

    location / {
        proxy_pass http://127.0.0.1:8080;
        proxy_http_version 1.1;
        proxy_set_header Upgrade $http_upgrade;
        proxy_set_header Connection $connection_upgrade;
        proxy_set_header Host $host;
        proxy_set_header X-Real-IP $remote_addr;
        proxy_set_header X-Forwarded-For $proxy_add_x_forwarded_for;
        proxy_set_header X-Forwarded-Proto $scheme;
    }
}
The first block (map) handles websocket connections correctly, the second redirects traffic from HTTP (port 80) to HTTPS (port 443) and the third is the actual proxy. If we use a domain name, we replace server_name _; with our domain, for example server_name bitwarden.yourdomain.com;, in both server blocks.
Save the file with CTRL+X, then Y and ENTER, enable the configuration by creating a link in the sites-enabled folder and check that there are no errors:
$ sudo ln -s /etc/nginx/sites-available/bitwarden.conf /etc/nginx/sites-enabled/
$ sudo nginx -t
If the nginx -t command returns “syntax is ok” and “test is successful“, restart NGINX so that the changes take effect:
$ sudo systemctl restart nginx
Accessing the Bitwarden web interface
With the proxy configured, we can access the Bitwarden web interface from our browser at:
https://RASPBERRY_IP
replacing RASPBERRY_IP with the IP address of the Raspberry Pi, or with the domain name if you have configured one. If we used a self-signed certificate the browser will show a security warning: we can safely proceed, knowing that we generated the certificate ourselves.
Click on “Create account” and fill in the form: the email address we will use to log in and the name to display in the interface, then click on “Continue“. On the next screen choose a strong master password and confirm the creation of the account. Be careful: the master password cannot be recovered in any way, so if you forget it you will lose access to all your saved passwords.
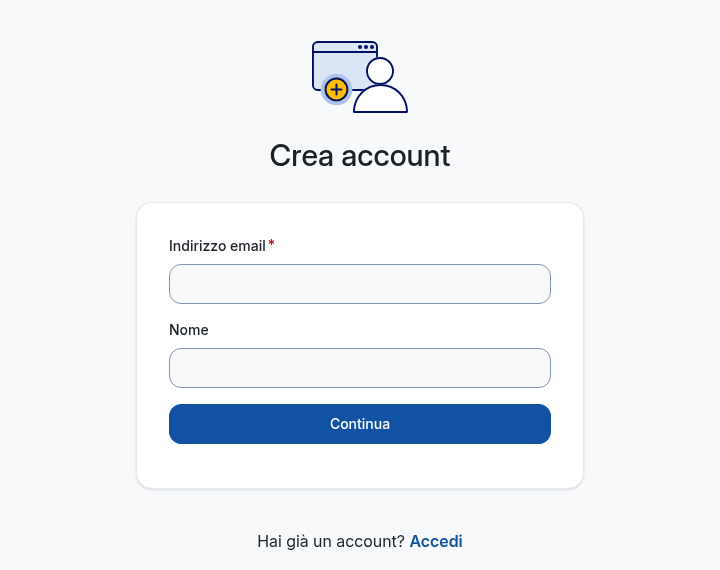
Once the account is created, we can log in with our email and master password: from here on we can start saving our passwords in our new Bitwarden vault.
Connecting the Bitwarden clients to our server
To use our server with the official Bitwarden apps (desktop, smartphone and browser extensions), on the app’s login screen we need to select “Self-hosted” from the “Logging in on” menu and enter the address of our server, for example:
https://bitwarden.yourdomain.com
After saving, we will be able to log in with the email and master password of the account we created earlier.
Enabling the Bitwarden admin panel
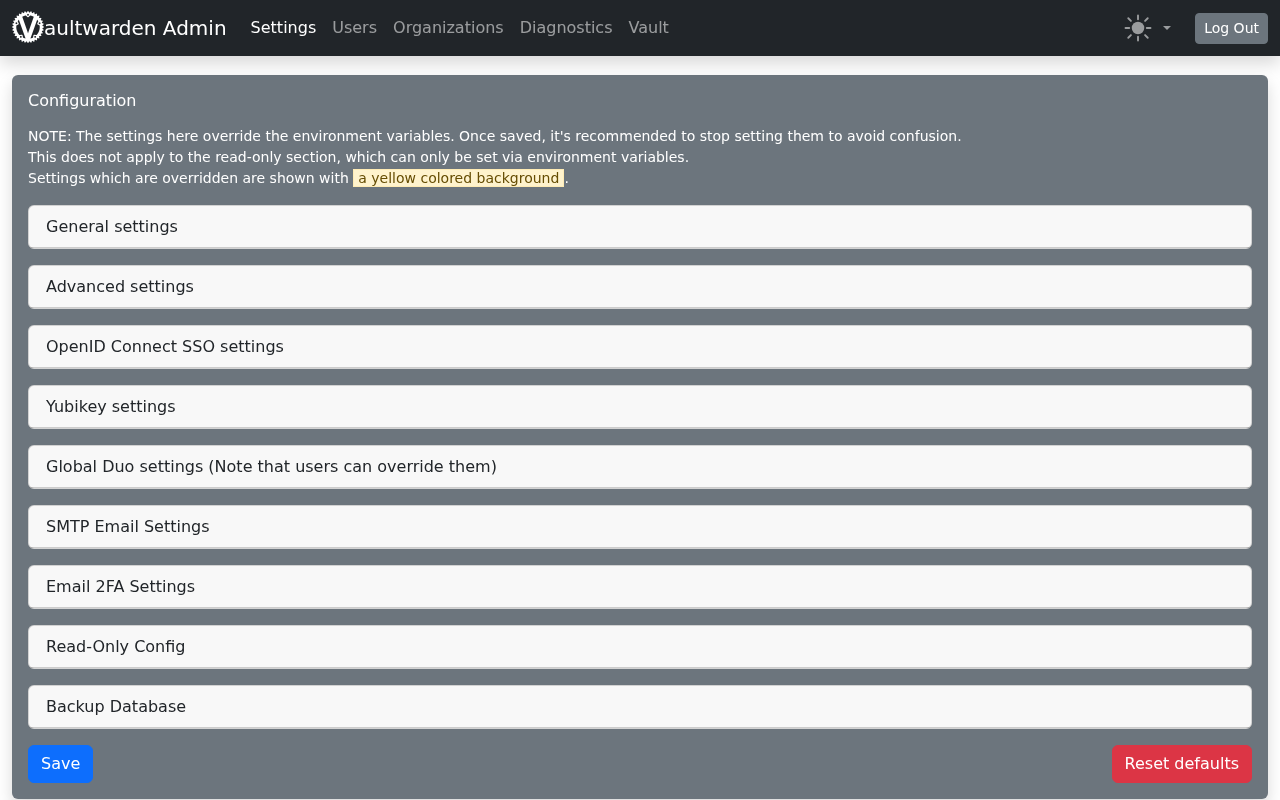
Vaultwarden provides an admin panel from which you can view and delete registered users, generate invitations and configure the various options of the service, such as whether or not new users can sign up. For security reasons the panel is disabled until we set an admin token.
Generating the admin token
The recommended method is to store only an encrypted version (an Argon2 hash) of the token in the configuration, instead of the plain-text token. Vaultwarden includes a dedicated generator: run the following command (where bitwarden is the name of our container):
$ docker exec -it bitwarden /vaultwarden hash
We will be asked to enter a password twice: this will be the password we use to log in to the admin panel, so choose a strong one and write it down in a safe place. The command will return a string similar to the following:
ADMIN_TOKEN='$argon2id$v=19$m=65540,t=3,p=4$MmeKRnGK5RW5...'
Copy the value between the quotes (the one starting with $argon2id$): this is the value to assign to the ADMIN_TOKEN variable.
Setting the admin token with Portainer
Open Portainer, go to the list of containers, click on the Bitwarden container to open its detail page and then on “Duplicate/Edit“.
Scroll down to “Advanced container settings“, open the “Env” tab and click on “add environment variable“. In the “name” field type ADMIN_TOKEN and in the “value” field paste the value generated in the previous step (without the quotes).
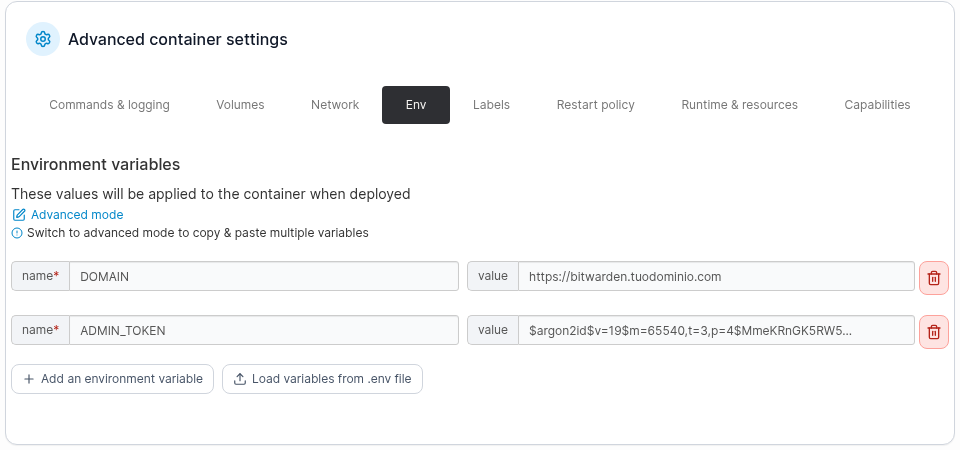
Click on “Deploy the container“: Portainer will warn that it will replace the existing container, since the name is the same. Confirm by clicking on “Replace“. No data will be lost, because it is stored in the “bitwarden” volume.
Setting the admin token with Docker Compose
If we used Docker Compose, let’s open the configuration file again:
$ cd ~/vaultwarden
$ nano docker-compose.yml
and add the ADMIN_TOKEN variable to the environment section. Warning: in the docker-compose.yml file every $ symbol in the token must be doubled ($$), otherwise Docker Compose will interpret it as a variable:
    environment:
      - DOMAIN=https://bitwarden.yourdomain.com
      - ADMIN_TOKEN=$$argon2id$$v=19$$m=65540,t=3,p=4$$MmeKRnGK5RW5...
Save the file and recreate the container with the command:
$ docker compose up -d
Docker Compose will notice the change and automatically recreate the container, keeping the data saved in the vw-data folder.
Accessing the Bitwarden admin panel
Once the token is set, we can reach the admin page from the browser at:
https://RASPBERRY_IP/admin
Enter the password chosen when generating the token and click on “Enter“: from here we can manage users and configure the Bitwarden settings.
Disabling the creation of new users
Once we have created our account and set up access to the admin panel, I recommend disabling new signups, so that only people we personally invite can create an account on our server. This is especially important if the server is reachable from the internet.
From the admin panel open “General settings“, find the “Allow new signups” option and untick the checkbox next to it. Scroll to the bottom of the page and click on the “Save” button to confirm.
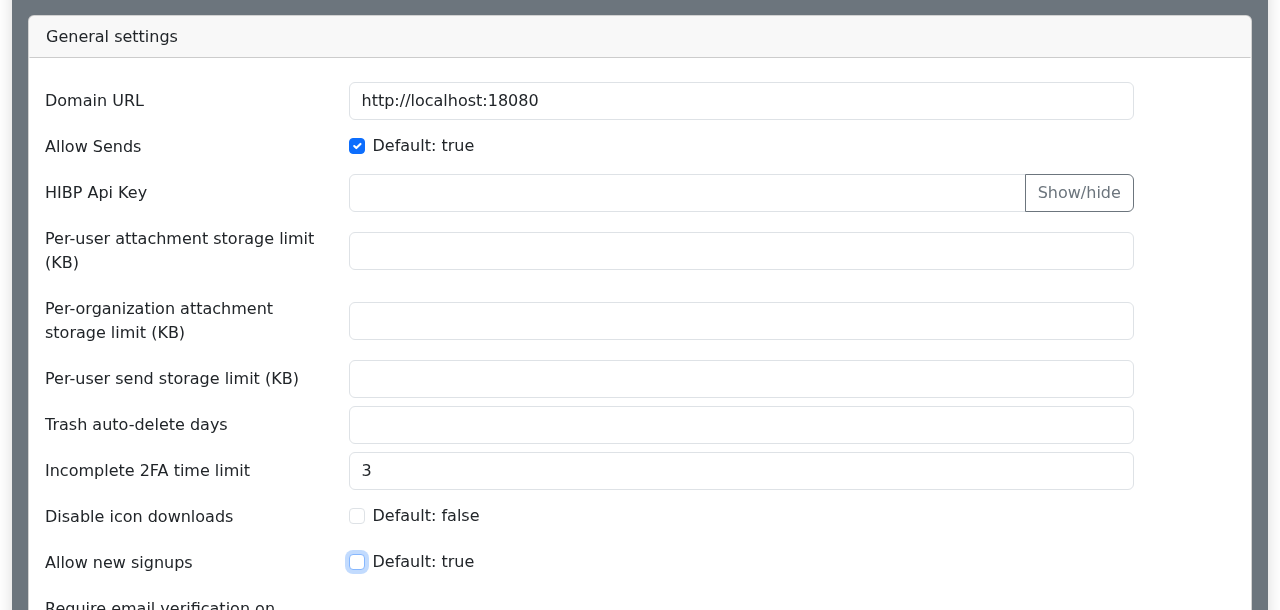
Alternatively, we can achieve the same result by adding the SIGNUPS_ALLOWED=false variable to the container configuration (with Portainer or in the docker-compose.yml file).
Backing up your data
Since these are our passwords, backups are essential. All the Bitwarden data (database, attachments and keys) is stored in the container volume: the ~/vaultwarden/vw-data folder if you used Docker Compose, or the “bitwarden” volume if you used Portainer.
The simplest way to take a consistent backup is to stop the container for a moment, archive the data folder and start it again. For example, with Docker Compose:
$ cd ~/vaultwarden
$ docker compose stop
$ tar -czf ~/bitwarden-backup-$(date +%Y_%m_%d).tar.gz vw-data
$ docker compose start
I recommend automating these commands with a script scheduled in crontab and saving the archive on another device, for example a NAS (here is a guide on how to connect an NFS share to the Raspberry Pi).
Updating Bitwarden
To update Vaultwarden to the latest version, with Docker Compose just run:
$ cd ~/vaultwarden
$ docker compose pull
$ docker compose up -d
while with Portainer it is enough to open the container, click on “Recreate” and enable the “Re-pull image” option. In both cases your data stays safe in the volume.
Conclusion
At this point Bitwarden should be up and running on our Raspberry Pi, ready to be connected to the official clients on desktop, smartphone and browser.
If you have any problems running the server, feel free to leave a comment below.
Have fun!
