In this article we will configure a gas/smoke sensor in HAP-NodeJS. I will also explain how to build it physically, using a Wemos D1 mini board and an MQ135 sensor.
Here too, I used the MQTT protocol (Mosquitto) to make the Raspberry Pi and the Wemos D1 mini communicate with each other.
As a prerequisite, you should of course have a Raspberry Pi with HAP-NodeJS correctly installed.
Below are the links to the two guides:
Apple HomeKit on Raspberry Pi
MQTT Broker (Mosquitto) on Raspberry Pi
You must also have installed the npm packages for the MQTT module; if you haven’t, the commands are as follows:
cd /home/pi/HAP-NodeJSsudo npm install mqtt --save
sudo npm install mqtt -g
To start, connect to your Raspberry Pi via SSH and run the following commands to download and install the accessory.
cd /home/pi/HAP-NodeJS/src/accessories
wget https://fargionconsulting.com/wp-content/uploads/2020/02/SmokeSensor_accessory.ts
Now, if you have set up HAP-NodeJS to start automatically (as described in this guide), restart the Raspberry Pi so that HAP-NodeJS detects the new accessory.
Also, if you have chosen to use BridgedCore.ts, the accessory will automatically appear alongside the accessory you created and paired previously; if you are using Core.ts, you will need to add the new accessory from your Apple device. For this sensor too, pairing is done with the code 031-45-154.
Now let’s move on to the hardware. Unfortunately there is no ready-made shield here either, but that is not a problem: simply connect the sensor’s three pins directly to the pins on the Wemos D1 mini board.
the wiring diagram is shown below.
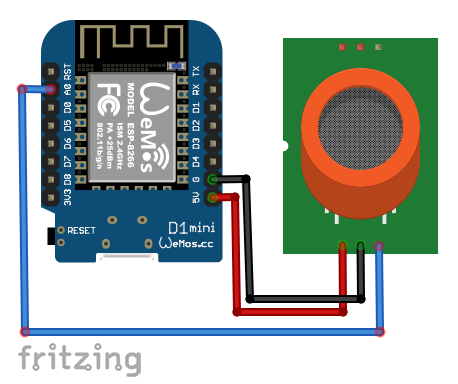
Now let’s move on to the Arduino code for the Wemos D1 mini, which you can download from this link.
Here too, note that some libraries need to be installed in the Arduino IDE; they are listed below:
- ArduinoOTA (available from the Library Manager in the Arduino IDE)
- PubSubClient by Nick O’Leary (available from the Library Manager in the Arduino IDE)
- RemoteDebug by Joao Lopes (available from the Library Manager in the Arduino IDE)
Now, before uploading the Arduino code to the Wemos D1 mini board (as well as selecting the right serial port, the correct board and the correct baud rate), we need to update the Arduino code with the name and password of our Wi-Fi network and the IP address of our Raspberry Pi — and that’s it!

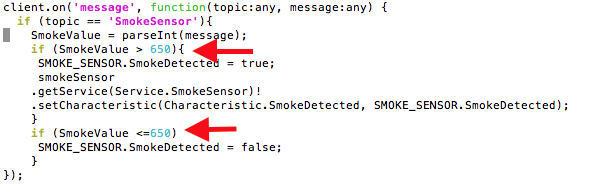
If the sensor is not sensitive enough, or too sensitive, simply change the SmokeValue value in the accessory’s file on the Raspberry Pi with the following command:
sudo nano /home/pi/HAP-NodeJS/src/accessories/SmokeSensor_accessory.ts
Enjoy!
