Setting up an SSH key pair on a Raspberry Pi is fairly simple and allows a more secure SSH connection over the network. Below I will explain how to create and configure SSH keys to connect remotely to a Raspberry Pi without having to enter a password.
SSH keys are usually created using public key cryptography. Put simply, a public key is stored on a remote device (such as our Raspberry Pi), while a second key, which remains private, is used by its owner to prove ownership. The public key can be given to anyone, while the private key must be kept secret. Only the pair together makes the cryptographic operation possible.
In practical terms, the keys are simply a long string of characters saved in a text file.
To follow this guide you will need either direct access (with a monitor and keyboard) or remote access via SSH or VNC to your Raspberry Pi.
Creating the SSH directory and the authorized_keys file
To start, go to your home directory with the following command:
cd ~
and then create a new directory called “.ssh”:
mkdir .ssh
If the .ssh folder already exists, skip to the “Creating a new key pair” section.
On Linux systems, folders and files whose names begin with a dot (“.”) are hidden from directory listings unless specific commands are used.
Now move into the new directory you just created:
cd .ssh
and create an empty file named “authorized_keys”:
touch authorized_keys
Setting permissions
A newly created directory usually has 755 permissions, i.e. read and execute for everyone and write for the owner.
The permissions of the .ssh directory must be changed to 700 to prevent others from reading, writing or executing:
chmod 700 ~/.ssh
For the same reason, you also need to change the permissions of the “authorized_keys” file so that only the pi user can read and write it:
chmod 600 ~/.ssh/authorized_keys
Creating a new key pair
To create a new cryptographic key pair, simply use the ssh-keygen command. First, move into the .ssh directory:
cd ~/.ssh
and run the ssh-keygen command:
ssh-keygen
You will then be asked for a location in which to save the key file. Press ENTER to accept the default.
You will then be asked for a passphrase; this step is optional. If you set a passphrase, it will be requested whenever the keys are used, as an additional layer of security. It is up to you whether to use one. So enter a passphrase or leave the field blank, then press ENTER to finish creating the SSH key.
WARNING: if you choose to create your SSH keys with a passphrase, you absolutely must not forget it! There is no way to recover it.
At the end of this process, two files will be created: a public key called “id_rsa.pub” and a private key called “id_rsa”.
Add the contents of the public key to the authorized_keys file with the following command:
cat id_rsa.pub >> authorized_keys
Some SSH clients prefer PuTTY-style keys. In that case, it is a good idea to create a version of the file in this format now, so that you can download it later (if needed).
The following commands install putty-tools, which lets you use the puttygen command to create a PuTTY version of the keys you just generated:
sudo apt-get install putty-tools
then:
puttygen id_rsa -o id_rsa.ppk
You should now have three files:
- id_rsa
- id_rsa.pub
- id_rsa.ppk
Copy the three files to a safe location. The private key (id_rsa or id_rsa.ppk) is required by the client used to connect to the Raspberry Pi. The client could be a desktop PC, a laptop, a tablet or even a smartphone.
The public key (id_rsa.pub) will be used by the Raspberry Pi you connect to.
You can use the same public key on several devices, as long as the private key matches.
Once you have saved the keys in a safe location, you can delete them from the Raspberry Pi with the following command:
rm id_rsa id_rsa.pub id_rsa.ppk
Adding an existing key
If you already have an SSH key pair (public and private), you can add the public key to the “authorized_keys” file.
There are two ways to add the public key details to the keys file.
The first is to edit the keys file directly in the nano text editor with the following command:
nano authorized_keys
and paste the contents of the public key file into the text editor.
When you have finished editing the file, press CTRL-X, Y and ENTER to save the changes and return to the command line.
The second method is to copy the public key file (for example id_rsa.pub) into the .ssh directory and then use the following command to add it to the keys file:
cd ~/.ssh && cat id_rsa.pub >> authorized_keys
where “id_rsa.pub” is the public key file.
Now that the authorized_keys file has been updated, you can remove the id_rsa.pub file:
rm id_rsa.pub
Configuring the SSH client
You can now use your favourite SSH client to connect to the Pi, but instead of entering a password you simply point it to the private key.
The procedure depends on the client you use.
Below is an example of the settings in WinSCP:
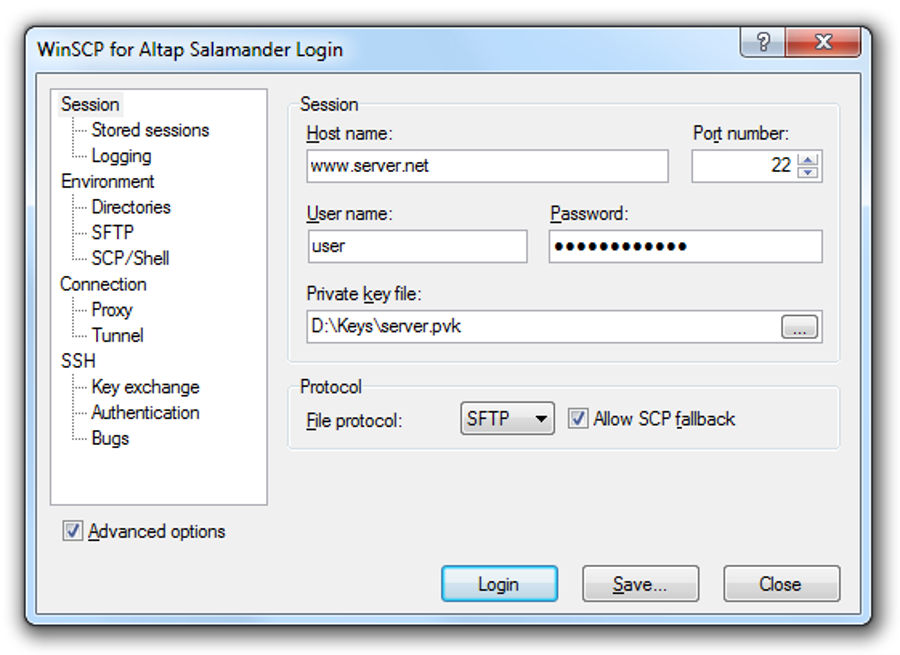
while the following screenshot shows the window where you set the key in PuTTY.
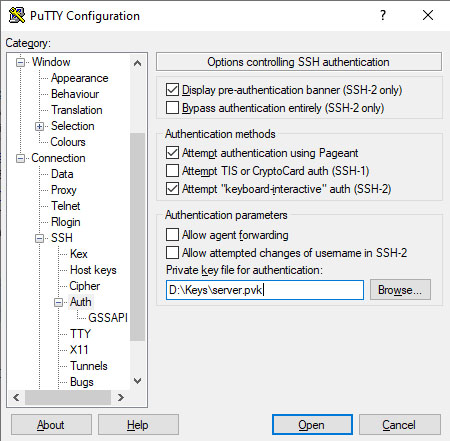
The IP address and username must be specified, and you also need to select the private key file.
Other SSH clients work in a similar way.
and if you want to start an SSH connection from another machine via the terminal, supplying the private key, simply type:
ssh pi@192.168.1.100 -i ~/.ssh/id_rsa
where:
192.168.1.100must be replaced with your Raspberry Pi’s IP address,- the
-iparameter indicates that the local path and file name of the private key follow. In this example, the private key file is in the .ssh folder in our home directory (on Unix systems, and in PowerShell, the ~ character refers to the home folder of the currently authenticated user).
Connecting
If the configuration is correct, you can now connect to your Pi without entering a password.
Although several clients can store passwords, the advantage of SSH keys is that you can use the same key file on all your clients. If you change the key file, you won’t need to change the password on every machine where it was stored.
Finally, you can store the private key on a removable drive or in an encrypted container (such as VeraCrypt). This way, even if your computer is lost or stolen, connections to the device will not work, even if an attacker opens the SSH client and sees the saved sessions: it will not be possible to log in without the key file.
Converting PPK files into public and private keys with puttygen
If you ever need to convert a PuTTY PPK file into an OpenSSH-style key file, here are the commands to convert PPK files into private and public keys:
puttygen my_key.ppk -O private-openssh -o my_key.private
puttygen my_key.ppk -O public-openssh -o my_key.public
Enjoy!
