The Raspberry Pi should not be thought of simply as a computer for creative DIY projects: thanks to its mini-computer form factor, good performance and low power consumption, it is also used as a server for many types of service (for example cloud servers, media servers, DNS, OpenVPN, Homebridge…).
Especially for this kind of use, where a monitor and keyboard don’t need to be permanently connected (except to change code or check a service’s logs), many users rely on remote access via SSH (Secure Shell) so that they don’t have to connect a monitor and keyboard whenever they need to change the server’s settings.
In early releases of Raspberry Pi OS (Raspbian), SSH was enabled by default, but since late 2016 it has been disabled.
To enable SSH on your Raspberry Pi, you can use any of the following methods:
Enabling SSH on the Raspberry Pi in headless mode
If you are using your Raspberry Pi without a monitor and keyboard, you need to enable SSH in what is called “headless” mode, which involves creating an empty file called ssh and placing it in the boot partition of the Raspberry Pi’s memory card.
That’s it. Your Raspberry Pi is now accessible via SSH.
Make sure the device is connected to the network before trying to establish an SSH session.
Enabling SSH on the Raspberry Pi from the GUI
Things become much easier when you have a monitor, keyboard and mouse available.
If you are used to configuring your device through the graphical interface (GUI), follow these steps.
Once the device has booted:
- 1. Click the Raspberry Pi logo in the top left-hand corner;
- 2. Select Preferences → Raspberry Pi Configuration
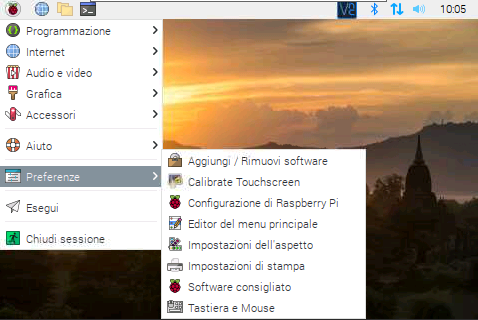
- 3. Switch to the Interfaces tab in the configuration window;
- 4. Enable SSH in the second row
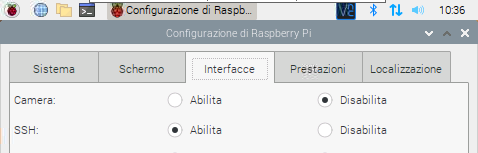
- 5. Click OK to save the changes.
That’s it. Your Raspberry Pi is now accessible via SSH. Make sure the device is connected to the network before trying to establish an SSH session.
Enabling SSH on the Raspberry Pi from the terminal
If you are used to configuring your system from the terminal, you can choose either of the following two options.
Enabling SSH with raspi-config
To enable SSH using the raspi-config tool:
- 1. Open the terminal on your Raspberry Pi and run the following command:
sudo raspi-config
This loads the tool, with a BIOS-like screen.
- 2. Use the arrow keys to select Interface Options.

- 3. Then select the P2 SSH option from the list
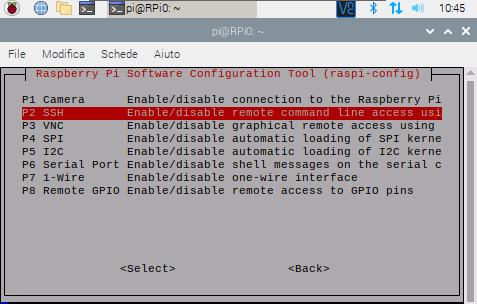
- 4. Select <Yes> when asked “Would you like the SSH server to be enabled?“
- 5. Press Enter on the “The SSH server is enabled” confirmation box.
- 6. Navigate down and select Finish to close raspi-config.
That’s all for this method too. Your Raspberry Pi is now accessible via SSH. Make sure the device is connected to the network before trying to establish an SSH session.
Enabling SSH using systemctl
The last option for enabling SSH on your Raspberry Pi is to start the service via systemctl from the terminal, using these two simple commands:
sudo systemctl enable ssh
sudo systemctl start ssh
Your Raspberry Pi is now accessible via SSH.
Make sure the device is connected to the network before trying to establish an SSH session. The SSH service is now enabled and running.
Enjoy!
