What is Airsonic-Advanced?
Airsonic-Advanced is a more modern implementation of Airsonic with several improvements in performance and key features. It adds to and replaces several of Airsonic’s features.
Airsonic is a free, web-based media streamer that gives you access to your music (wherever you are, as long as you are connected to the internet, have set up port forwarding or NAT on your modem/router, and have either a public IP or a DDNS hostname). You can use it to share your music with friends, or to listen to it while you are at work. You can also stream music to several players simultaneously, for example to a player on your smartphone and another on your PC. Put simply, it is a kind of Spotify, but with your own music.
Airsonic is designed to handle very large music libraries (hundreds of gigabytes). Although it is optimised for MP3 streaming, it works with any audio format that can be streamed over HTTP, such as AAC and OGG. Using transcoding plugins, Airsonic supports on-the-fly conversion and streaming of virtually any audio format, including WMA, FLAC, APE, Musepack, WavPack and Shorten.
If you have limited bandwidth, you can set a bitrate limit for music streams, and Airsonic will automatically resample the music to a suitable bitrate.
As well as being a streaming media server, Airsonic also works very well as a local jukebox. The intuitive web interface, along with the search and index features, is optimised for efficient browsing of large libraries. Airsonic also comes with a built-in podcast receiver, with many of the same features found in iTunes.
Written in Java, Airsonic runs on most platforms, including Windows, Mac, Linux and Unix variants, and also as a Docker container.

Requirements
Let’s look at the requirements for achieving our goal. In this case we are talking about hardware, software and networking requirements.
In terms of hardware, we are considering the Raspberry Pi, using the 3 Model B+ or later as a reference. A further hardware requirement is enough storage space to hold your music library. This can be on the Raspberry Pi’s microSD card, on an external hard disk connected via USB, or on a NAS.
As for the basic software requirements, I will only consider the operating system installed on the Raspberry Pi and the presence of Docker and docker-compose.
I generally recommend installing Raspberry Pi OS, a free Debian-based operating system optimised for Raspberry Pi hardware.
To install Docker, I recommend following this guide.
The other requirement relates to networking: to access your music library remotely, you need a public IP address or, alternatively, a DDNS service that lets you reach your network through a domain name (here is a guide to using DuckDNS), and you must have forwarded the necessary ports on your router to the Raspberry Pi (in this tutorial you will need to forward TCP port 4040, or alternatively use a proxy)
Before going any further, check whether any updates have been released for Raspberry Pi OS in the meantime and, if so, install them. You can update the distribution with the following command
sudo apt update && sudo apt dist-upgrade
Preparing the environment
I have many Docker containers on my Raspberry Pi, so to keep the folder structure clearer I prefer to nest all containers inside a single folder (each with its own subfolder)
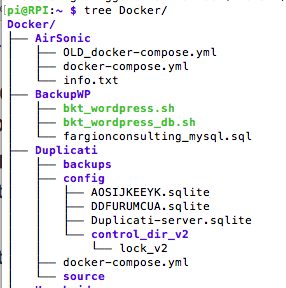
so, following this example, open an SSH session (or alternatively grab a monitor, keyboard and mouse) and, once in the terminal session, type:
cd ~
now, if you already have the Docker folder, type
cd Docker
or, if you want to create this folder, type:
mkdir Docker && cd Docker
next, create the subfolder that will contain the configuration file for our new container and move into it:
mkdir AirSonic && cd AirSonic
then create the file with the following command:
nano docker-compose.yml
and enter the following in it:
version: "3"
services:
  airsonic-advanced:
    image: airsonicadvanced/airsonic-advanced:latest
    container_name: airsonic-advanced
    environment:
      - TZ=Europe/Rome
#      - CONTEXT_PATH=<URL_BASE>       #opzionale
#      - JAVA_OPTS=<options>           #opzionale
    volumes:
      - ./playlists:/var/playlists
      - ./podcasts:/var/podcasts
      - ./data:/var/airsonic
      - ./music:/var/music

    ports:
      - 4040:4040
      - 4041:4041
#    devices:
#      - /dev/snd:/dev/snd #opzionale ... se si vuole abilitare la modalità jukebox in AirSonic
    restart: unless-stopped
In the volumes: section I declared ./playlists: ./podcasts: ./data: and ./music:.
The ./ in front of the folder name indicates that it will be located inside the folder where the docker-compose file is run, so the whole music library (playlists, podcasts and music) and Airsonic’s configuration and database (data) will be stored on the Raspberry Pi’s microSD card.
Personally, since I have a NAS, I preferred to store all this data there using NFS, and to mount these volumes directly from the container itself I used the following version of the docker-compose.yml file
version: "3"
services:
  airsonic-advanced:
    image: airsonicadvanced/airsonic-advanced:latest
    container_name: airsonic-advanced
    environment:
      - TZ=Europe/Rome
#      - CONTEXT_PATH=<URL_BASE>      #opzionale
#      - JAVA_OPTS=<options>          #opzionale
    volumes:
      - playlists:/var/playlists
      - podcasts:/var/podcasts
      - data:/var/airsonic
      - music:/var/music

    ports:
      - 4040:4040
      - 4041:4041
#    devices:
#      - /dev/snd:/dev/snd #opzionale ... se si vuole abilitare la modalità jukebox in AirSonic
    restart: unless-stopped

volumes:
  data:
    driver: local
    driver_opts:
      type: nfs
      o: addr=192.168.0.200,nolock,soft,rw    #sostituire l'ip con quello del vostro server nfs
      device: :/volume1/AirSonic/data         #cartella sul NAS da montare nel volume data
  music:
    driver: local
    driver_opts:
      type: nfs
      o: addr=192.168.0.200,nolock,soft,rw    #sostituire l'ip con quello del vostro server nfs
      device: :/volume1/AirSonic/Music        #cartella sul NAS da montare nel volume music
  playlists:
    driver: local
    driver_opts:
      type: nfs
      o: addr=192.168.0.200,nolock,soft,rw    #sostituire l'ip con quello del vostro server nfs
      device: :/volume1/AirSonic/playlists    #cartella sul NAS da montare nel volume playlists
  podcasts:
    driver: local
    driver_opts:
      type: nfs
      o: addr=192.168.0.200,nolock,soft,rw    #sostituire l'ip con quello del vostro server nfs
      device: :/volume1/AirSonic/podcasts     #cartella sul NAS da montare nel volume podcasts
Once you have chosen which of the two docker-compose files to use, pasted the text and adapted it to your needs, close the file by pressing CTRL+X, then type Y (or S, depending on your system language) and finally press ENTER to confirm.
Now run the following command to download and start Airsonic-Advanced with the specified parameters:
docker-compose up -d
Once the docker-compose command has finished, wait a few minutes and then try accessing the Airsonic web interface by opening a web browser on your computer and typing the following in the address bar:
http://<IP-DEL-TUO-RASPBERRY-PI>:4040
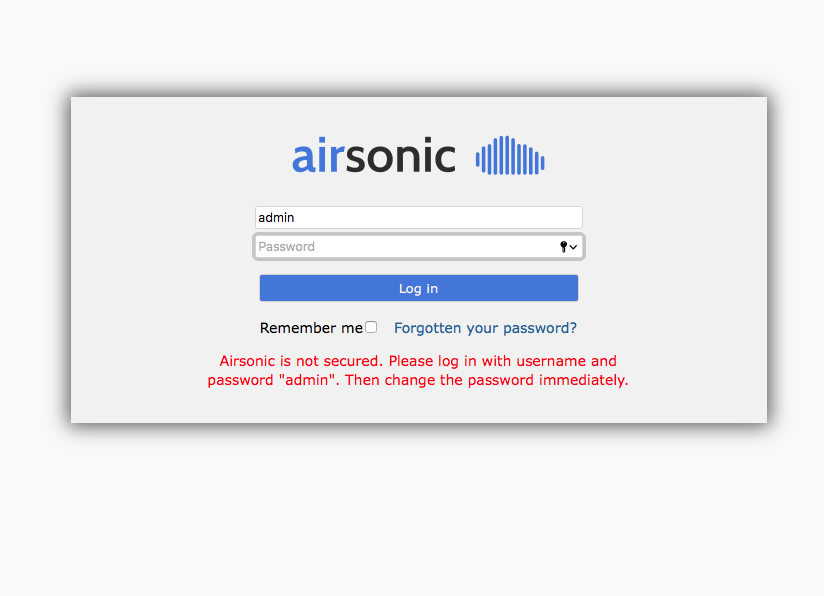
As clearly stated on the screen that appears, the credentials for accessing the Airsonic web interface are:
username – admin
password – admin
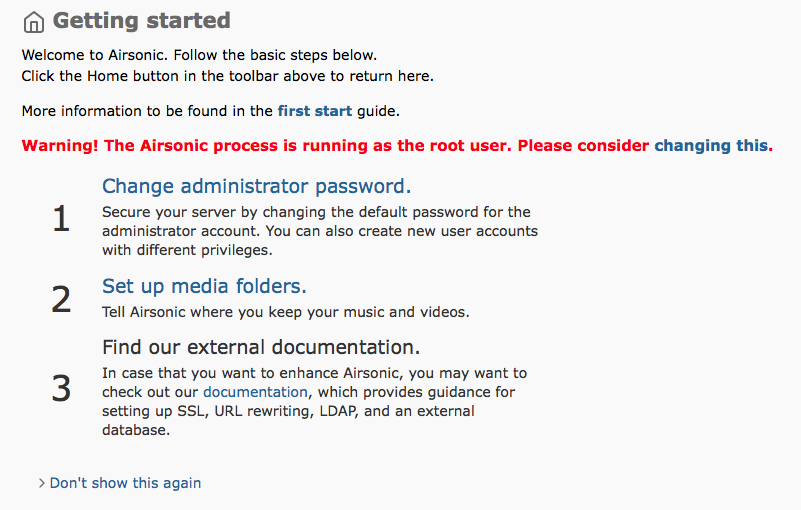
As soon as you log in, you will be greeted by a welcome screen that guides you step by step through the preliminary setup: first of all changing the admin user’s password, then setting the folders containing your media, and finally where to find online documentation about Airsonic.
Now, to make this web interface accessible from outside your home, simply forward the same port from your router’s WAN port to the same port on the Raspberry Pi on the LAN.
If you want to connect to this service comfortably from a smartphone or tablet, I recommend using one of the apps listed at the following link:
https://airsonic.github.io/docs/apps/
Enjoy!
