In this article we will configure a Raspberry Pi as a HomeKit server. If you wish, you can use just the Raspberry Pi and a few relays (driven by the Raspberry Pi’s GPIO pins) to control one or more power sockets from your Apple device (iPhone, iPad, Mac, etc.). Personally, I used the Raspberry Pi purely as a HomeKit server (bridge), with several WeMos D1 Mini boards around the house to control power sockets, lights, a fan, the boiler thermostat and the air conditioner, and also to measure temperature and humidity in some rooms. With that said, let’s prepare our Raspberry Pi.
All of this has been made possible by KhaosT, who published the HAP-NodeJS repository on GitHub (https://github.com/KhaosT/HAP-NodeJS)
First, connect to your Raspberry Pi via SSH and run the usual commands to update it:
sudo apt-get update && sudo apt-get upgrade -y && sudo apt-get dist-upgrade
Installing Node.js, npm, node-gyp and the other things we need:
Now we can proceed with installing HAP-NodeJS.
sudo apt-get install git-core libnss-mdns libavahi-compat-libdnssd-dev -y
sudo apt-get install -y npm
Next, we need to download Node.js. At the time of writing, the latest version of Node.js is 13.7.0; check https://nodejs.org/dist/ for the latest version of Node.js.
Before running the wget command to download the package, you need to know which architecture your Raspberry Pi uses.
To find out, type the “lscpu” command in the terminal; the output will show the architecture in use.
For example, on a Raspberry Pi 3B the architecture is armv7l, while on a Raspberry Pi Zero W the architecture is armv6l.
For a Raspberry Pi 3B, the commands are:wget https://nodejs.org/dist/v13.7.0/node-v13.7.0-linux-armv7l.tar.gz
tar -xvf node-v13.7.0-linux-armv7l.tar.gz
cd node-v13.7.0-linux-armv7l
while for a Raspberry Pi Zero W, the commands to run are:wget https://nodejs.org/dist/latest-v11.x/node-v11.15.0-linux-armv6l.tar.gz
tar -xvf node-v11.15.0-linux-armv6l.tar.gz
cd node-v11.15.0-linux-armv6l
the rest of the procedure is the same regardless of the hardware architecture.sudo cp -R * /usr/local/
cd ..sudo npm config set registry http://registry.npmjs.org/
sudo npm install -g node-gypsudo npm install -g ts-nodesudo npm install -g typescript
Clone the HAP-NodeJS project from KhaosT’s repository:
git clone https://github.com/KhaosT/HAP-NodeJS.gitsudo chown -R pi ./HAP-NodeJSsudo chgrp -R pi ./HAP-NodeJSsudo chmod g+s ./HAP-NodeJSsudo chmod u+s ./HAP-NodeJScd HAP-NodeJSnpm rebuildnpm installnpm install --only=dev
Once all these steps are complete, try starting the HomeKit server with the command:
ts-node --files src/BridgedCore.ts
or ts-node --files src/Core.ts
(with the first command, you only need to enter the pairing code once and all the accessories configured on the Raspberry Pi will be shown on your device, whereas with the Core.ts command you need to pair one accessory at a time. Choose whichever suits you best.)
After a few seconds, the HAP-NodeJS service will start exposing a series of demo accessories already configured on the Raspberry Pi (specifically, inside the HAP-NodeJS folder you will find a folder called “src”, which contains another folder called “accessories” where the accessories are stored).
At this point, take your Apple device (an iPhone, iPad or Mac that supports HomeKit), open the Home app and add a new accessory.
The code to use when adding the accessories is: 031-45-154
Below is a short video showing how to pair the (pre-installed) demo accessories.
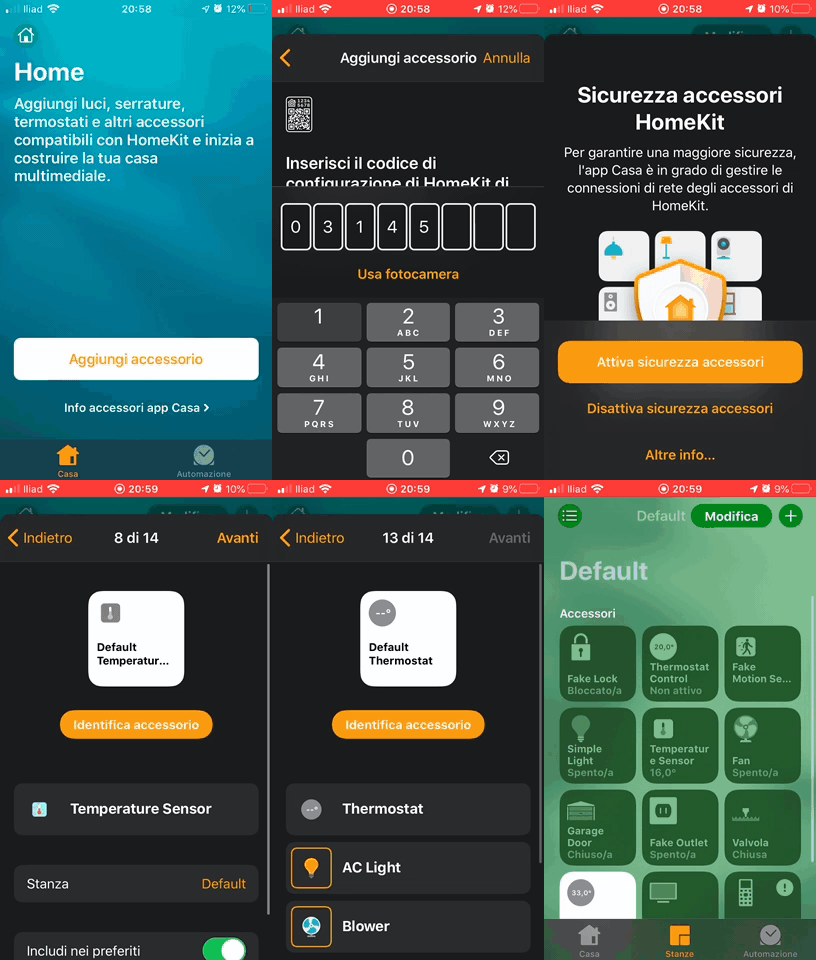
Now that we have tested our Raspberry Pi-based HomeKit server, we can stop the test by returning to the terminal window and pressing CTRL+C.
Below are some links showing in detail how to modify a HomeKit accessory and make it interact with a Wi-Fi Arduino board via MQTT, and how to make the HAP-NodeJS service start automatically when the Raspberry Pi boots.
How to install an MQTT broker on Raspberry Pi
How to start the HAP-NodeJS service automatically when the Raspberry Pi boots
To find out more about the subject, see Apple’s web page, which explains the features of this protocol in detail.
https://developer.apple.com/it/support/homekit-accessory-protocol/
Enjoy!
